
Picky
[EN] Senior Admin
-
Joined
-
Last visited
Everything posted by Picky
-
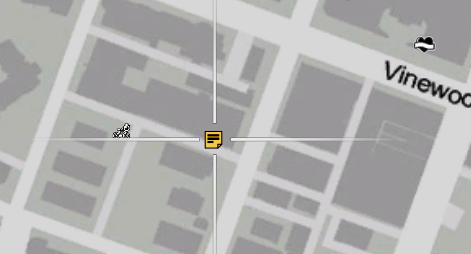
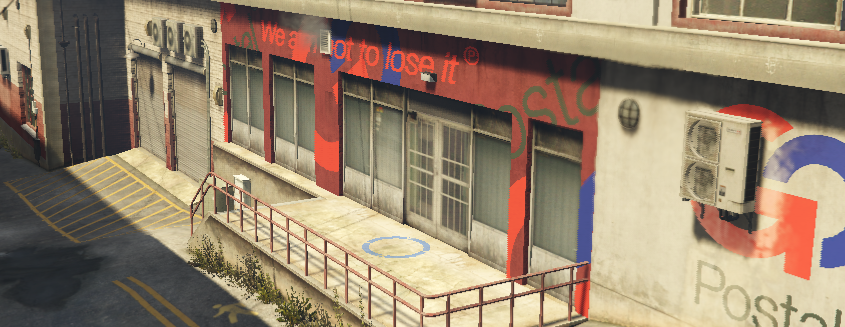
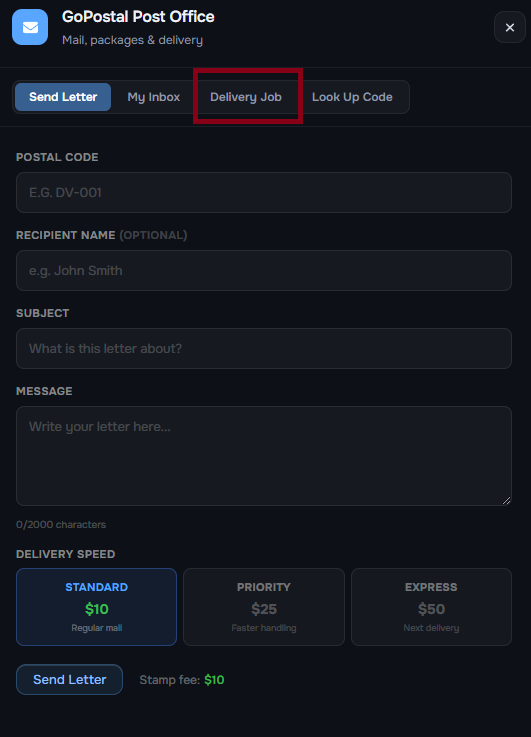
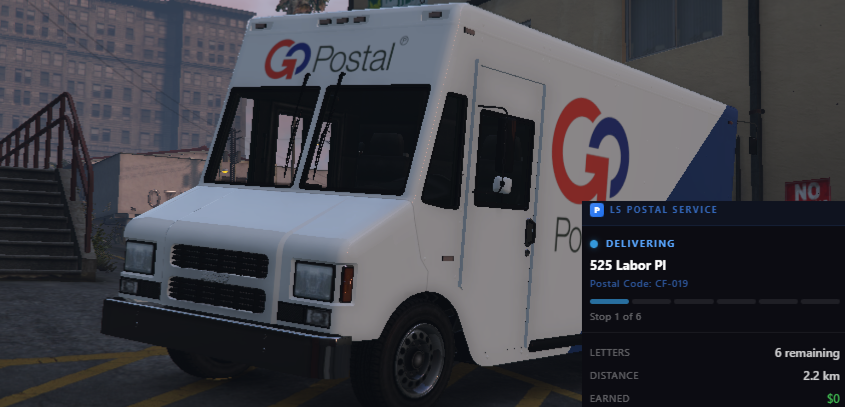
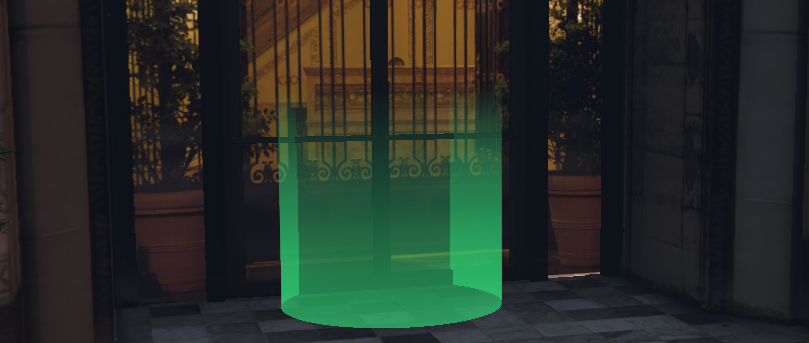
ROLEPLAY PROJECT · POSTAL JOB GUIDE [PICKY 1708/26.01] Welcome to the Postal Job on the RPP Server! The Postal Job is a simple and beginner-friendly profession focused on delivering mail and packages around Los Santos. It is an easy and quick job to complete, making it a great option for players looking for a straightforward way to earn money without spending too much time on a single route. While the Postal Job offers lower payouts compared to some other professions, its main advantages are speed, simplicity, and accessibility. It is ideal for players who want a quick and reliable source of income. This guide will cover everything you need to know, from starting the job and completing deliveries to understanding routes and maximizing your efficiency. What this guide covers: 📮 How to start and work the Postal Job 🚚 How the delivery system works HOW TO START AND WORK THE POSTAL JOB To begin your shift, you must first travel to the designated Postal job location. On the map, look for the yellow paper icon: Upon arrival Postal Job location would be found here: Right after you press E to open the postal menu, you’ll be greeted with the interface shown above. From here, head over to the "Delivery Job" section to see everything you need for your daily postal work. In this section, you’ll be able to check how many letters and packages are currently available and ready to be delivered, as well as see the payment you’ll receive for each completed delivery. Take a quick look, choose your deliveries, and hit the road - every successful delivery brings you a little closer to becoming one of Los Santos’ most reliable postal workers! HOW THE DELIVERY SYSTEM WORKS Once you’re ready to get started, simply click "Start Your Shift". Your postal vehicle will be spawned for you, and you’ll also notice a progress menu on the right side of your screen. This will help you keep track of your current deliveries and see how much work you have left to complete. As you make your way through Los Santos, keep an eye on your map for the green delivery blips. These mark the addresses where your next delivery needs to be made. Once you arrive at the location, park up nearby and press E to deliver the post. The delivery will be completed immediately, and you can continue on to your next stop.
-
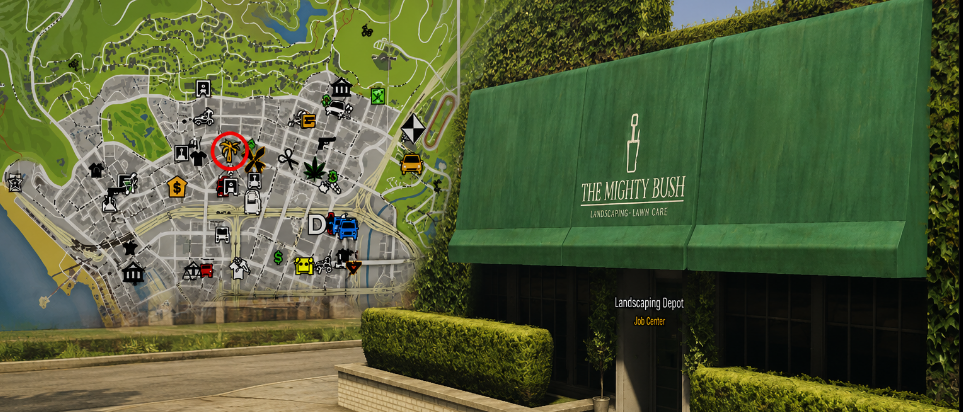
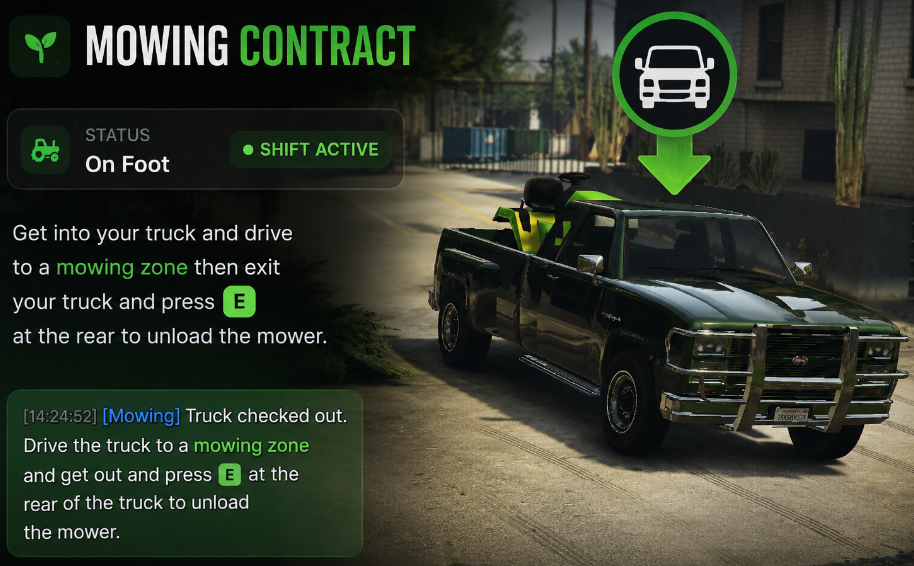
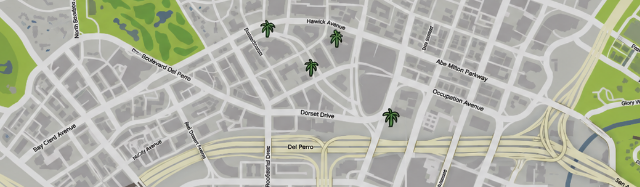
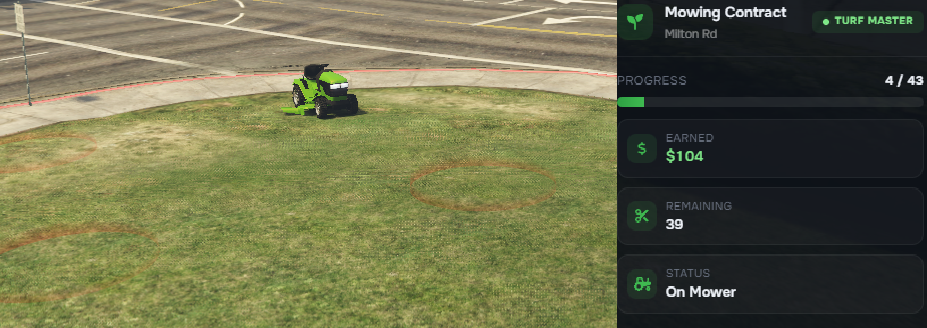
Roleplay Project · MOWER JOB GUIDE [Picky 1408/26.01] Welcome to the Mower Job on the RPP Server. The Mower Job is a straightforward landscaping profession focused on maintaining public and private areas around Los Santos. As a mower, your responsibility is to keep designated areas clean and well-maintained by operating the assigned lawn mower and completing your mowing routes. This job is designed to provide a simple and relaxing way to earn money while encouraging realistic roleplay. Players are expected to dress appropriately for outdoor landscaping work, operate their equipment responsibly, and follow the designated work procedures throughout their shift. Whether you're looking for a casual job, want to earn some extra money, or simply want to experience another civilian profession, this guide will explain everything you need to know about starting and working as a Mower. What this guide covers: 🚜 How to start and work the Mower Job 👕 Appropriate clothing and roleplay expectations 📈 How the mower level and progression system works HOW TO START AND WORK THE MOWER JOB 👕 Clothing & Roleplay Requirements Before beginning your career as a Mower, there are a few requirements and roleplay standards you must keep in mind. This job is built around realistic landscaping and groundskeeping work, so players are expected to portray the role appropriately and maintain a believable appearance and behavior throughout their shift. Suitable work clothing and appropriate footwear MUST be worn while working as a Mower. When operating a lawn mower, you are expected to maintain realistic roleplay and dress appropriately for the work you are performing. Professional landscaping involves spending extended periods outdoors, operating mowing equipment, working around grass and vegetation, and performing physical outdoor labor. Your character should therefore be dressed as an actual landscaping or groundskeeping worker would be. For example: Appropriate work clothing should be worn. Suitable and practical footwear must be worn. Protective footwear should be used when appropriate for the work. Work gloves and other protective equipment should be used when required. Avoid wearing sportswear, suits, expensive formal clothing, or other outfits that would be unrealistic for landscaping work. Do not operate a lawn mower while dressed in clothing that would not reasonably be worn by a professional groundskeeper. ⚠ Your roleplay portrayal should remain realistic at all times. You cannot reasonably expect to spend your shift mowing lawns while wearing a designer suit, expensive formal clothing, or an outfit completely unsuitable for outdoor manual labor.This is not only about following the clothing requirement — it is about maintaining the overall roleplay quality and realism of the job. Treat your work, equipment, and responsibilities as you would if you were actually employed as a professional landscaper. 🚜 Operating the Mower Once you have met the requirements and arrived at the job location, you will be provided with a dedicated lawn mower for your shift. Before beginning your route, make sure you are familiar with the equipment you will be operating. The mower is a piece of landscaping machinery, and your driving and behavior should reflect its purpose. When operating the mower: Avoid reckless or unnecessary driving. Operate the equipment carefully around pedestrians and other people. Be mindful of roads, sidewalks, buildings, vehicles, and surrounding objects. Remain within the designated work areas while mowing. Avoid damaging the mower through careless or reckless operation. Maintain realistic roleplay throughout your entire shift. ⚠ Remember that you are operating landscaping equipment, not simply using a vehicle to travel around Los Santos. Your movements and behavior should reflect someone who is actually performing groundskeeping work. NOTE: The goal is to portray an actual professional landscaper completing their assigned mowing work, rather than simply using the mower as a means of travelling from one location to another. Your clothing, driving, behavior, and overall roleplay should reflect the responsibilities that come with performing professional landscaping work. How the mower level and progression system works: Level 1 - Garden Hand - 0xp Level 2 - Mower Operator 200xp Level 3 - Landscaper - 600xp Level 4 - Head Groundskeeper - 1500xp Level 5 - Turf Master - 3200xp Before beginning your shift, you first need to locate the Mower Job on your map. Look for the yellow palm tree icon on the map. This icon marks the location where the Mower Job can be started. On the map below, the yellow palm tree highlighted by the red circle is the location you need to visit. Once you arrive, approach the Mower Job marker. Press E to interact with the job and begin the process. ⓘ An information menu will also appear on the right side of your screen with details about your current duty. Once you're inside your vehicle, check the map to find the green palm icons — these mark the available locations where you can work. Choose a location and drive there to begin your mowing job. Upon arriving at the location, park your truck properly and exit the vehicle. Go to the rear of the truck and press E to unload your mower — it will be unloaded immediately and ready for use. Once you start working with the mower, you will see red blips marked on the grass. Each location can have a different number of red blips depending on the size of the job. You can check your progress and see how many areas are remaining on the right side of your screen. Drive your mower to each red-marked area and complete the mowing — you will receive your payment immediately after completing each red point. Once all red points have been completed, drive back towards your vehicle and press E at the back of the truck to load the mower back onto the vehicle. You can then continue to your next desired location, or if you are finished working, return to the depot and press E to return the duty vehicle and end your shift. ! YOUR SHIFT STARTS HERE! Grab your mower, head out to the grass, and get to work. Every area you mow, every red point you complete, and every job you finish puts you one step closer to becoming one of Los Santos’ most reliable landscapers. Keep your mower running, take care of every location, and keep Los Santos looking fresh and clean! [Picky 1408/26.01]
-
Congratulations all. I am late.
-
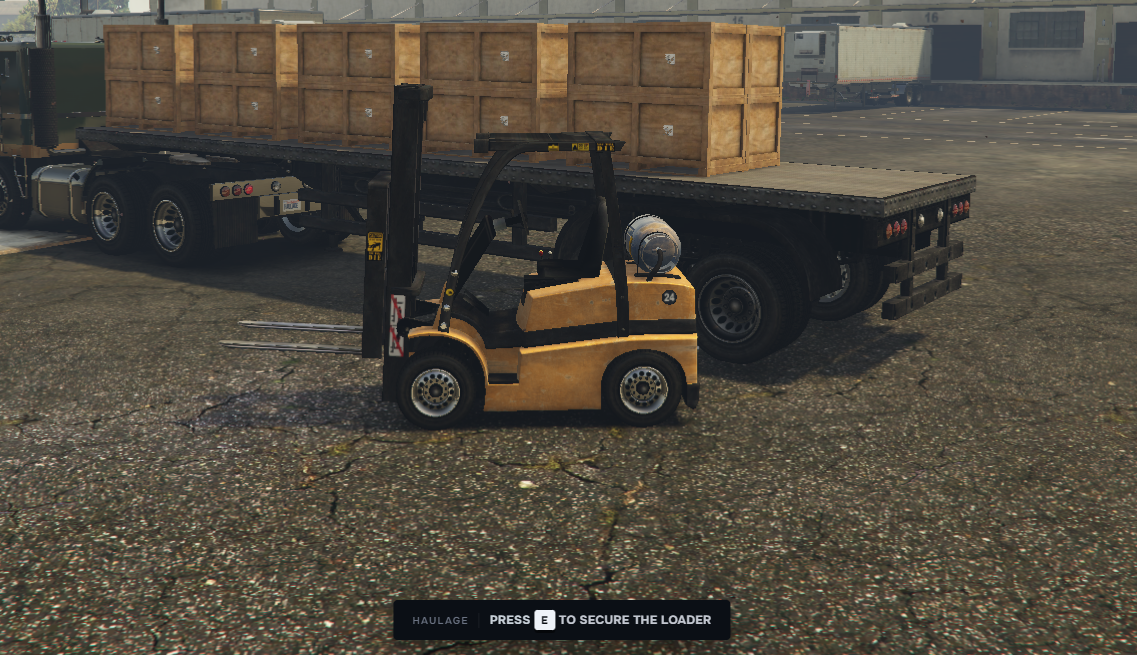
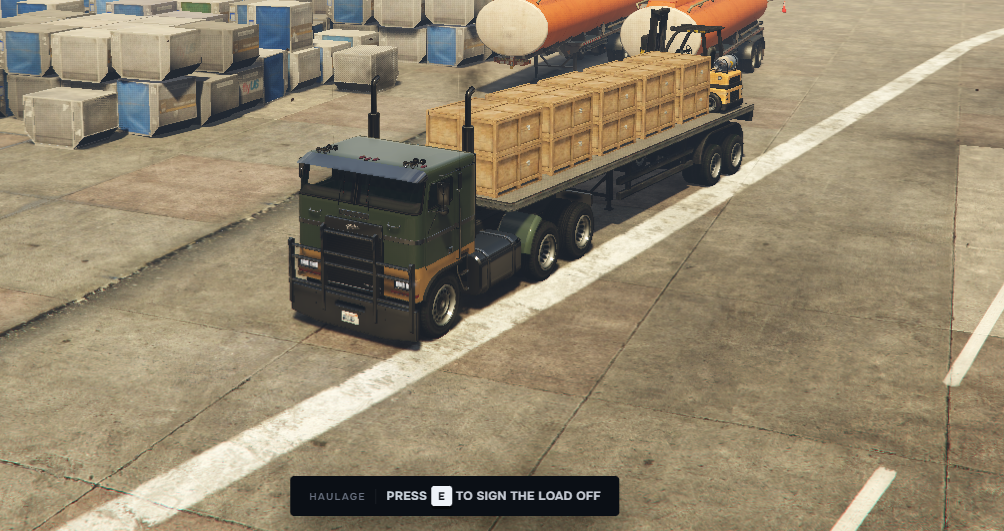
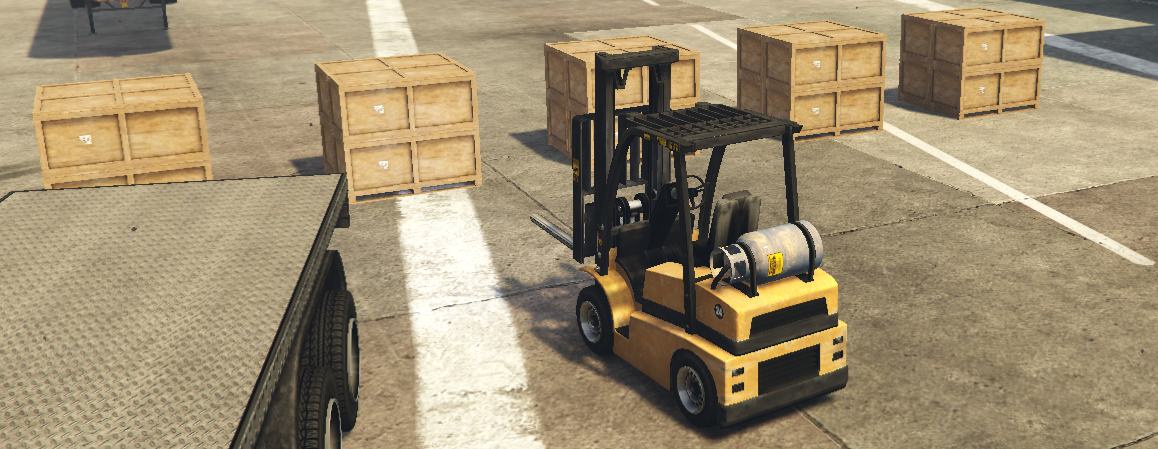
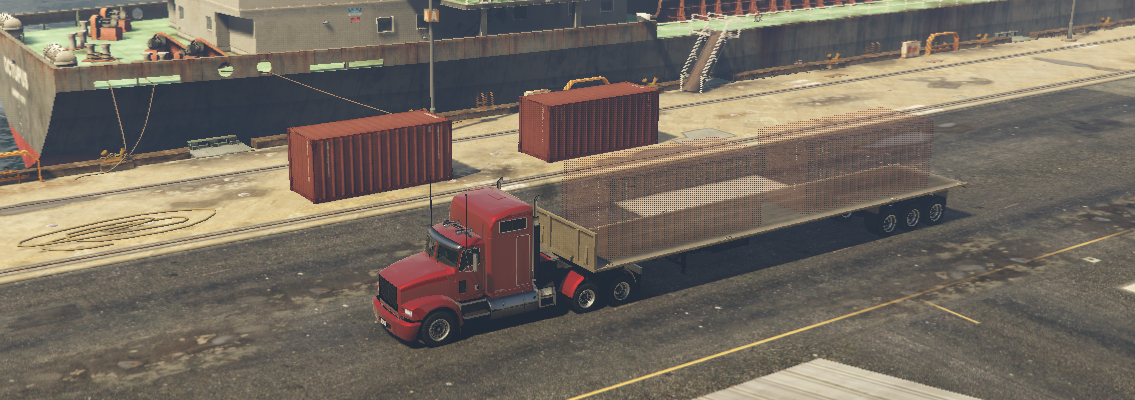
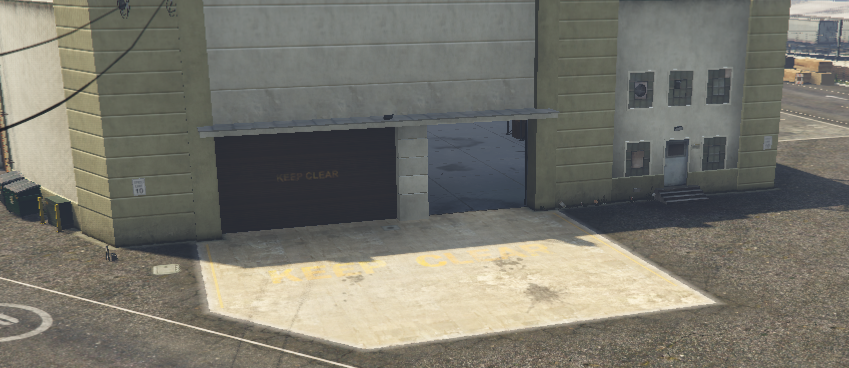
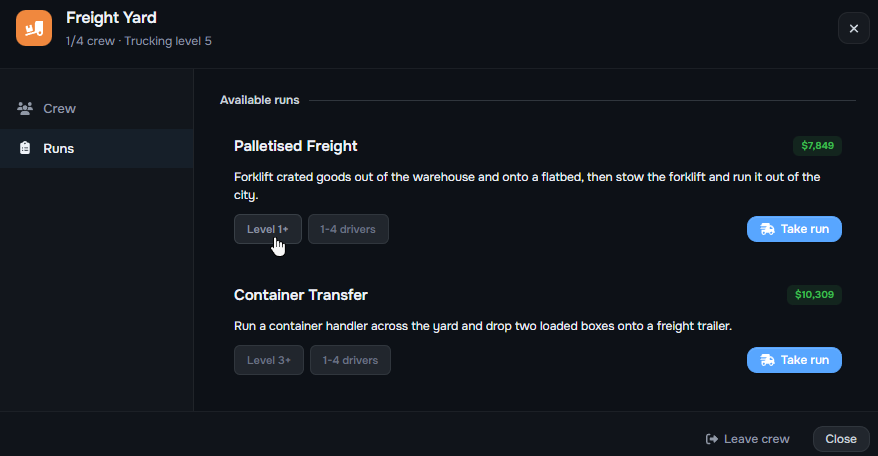
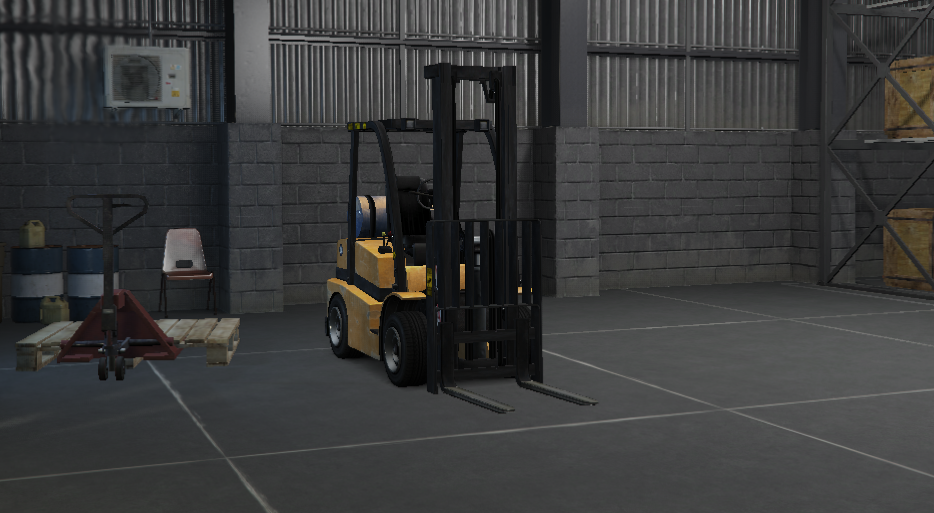
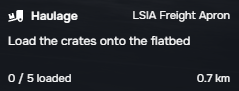
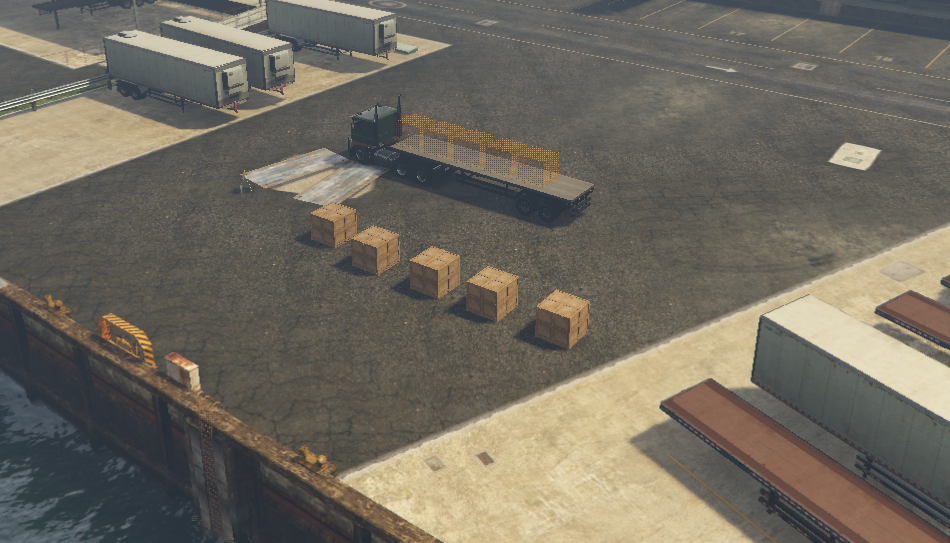
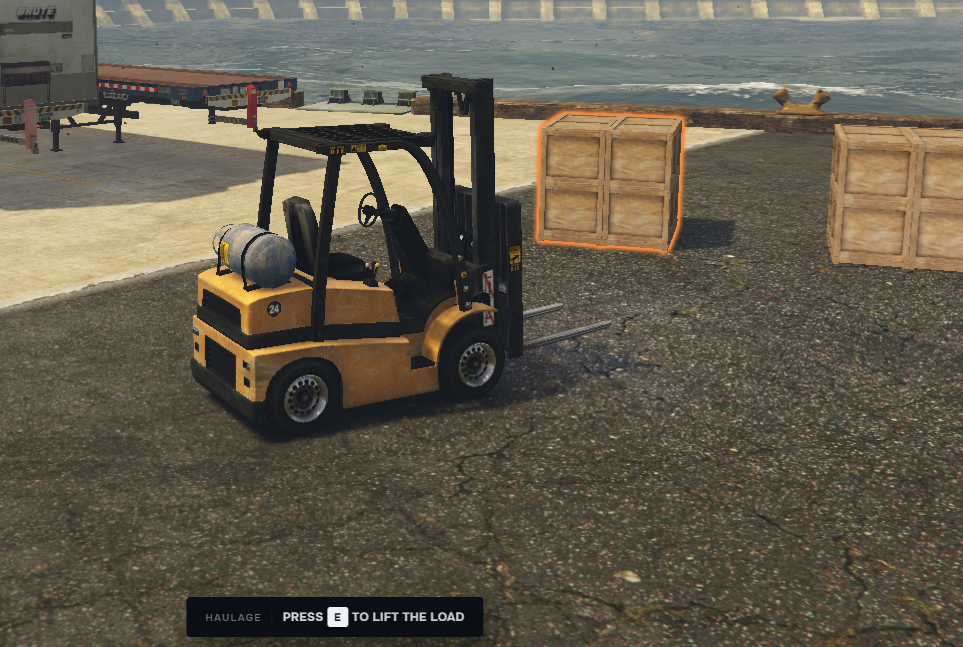
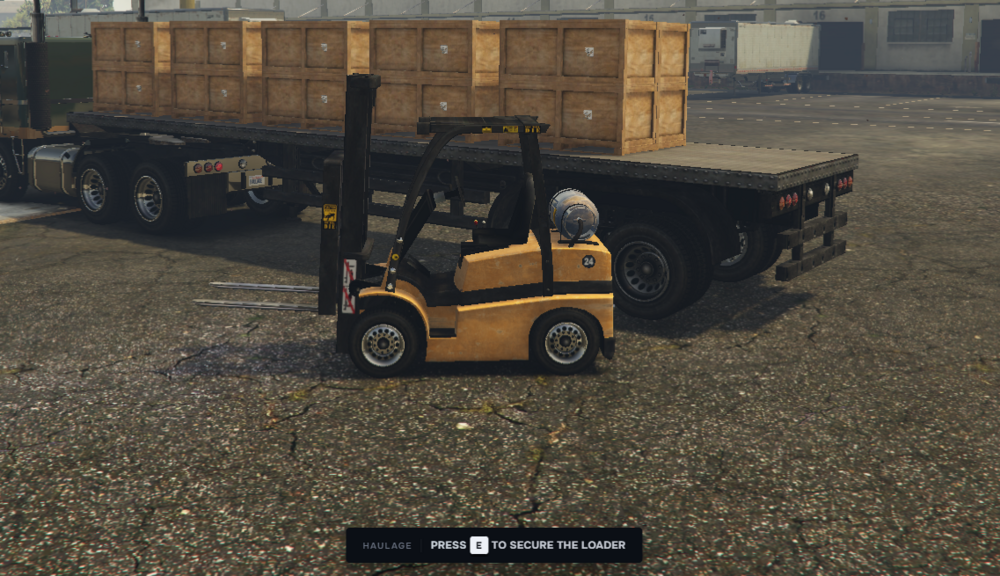
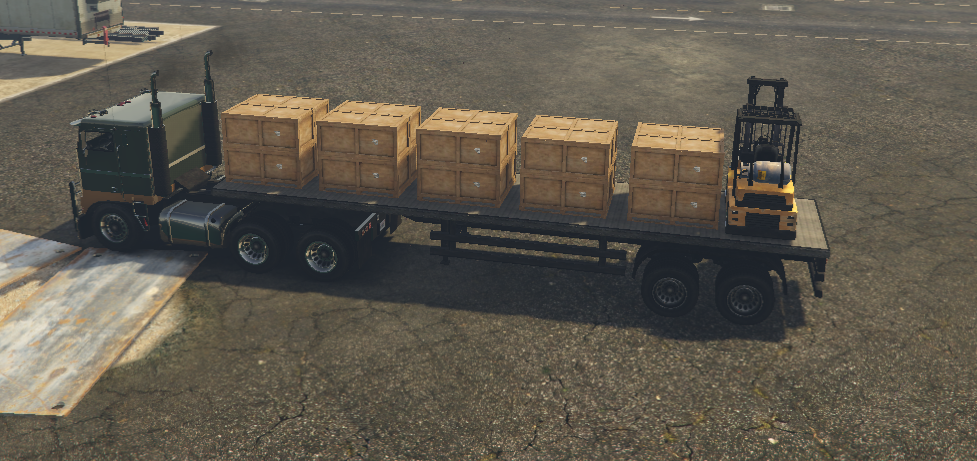
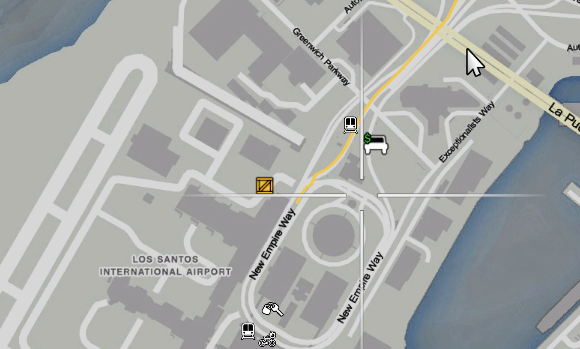
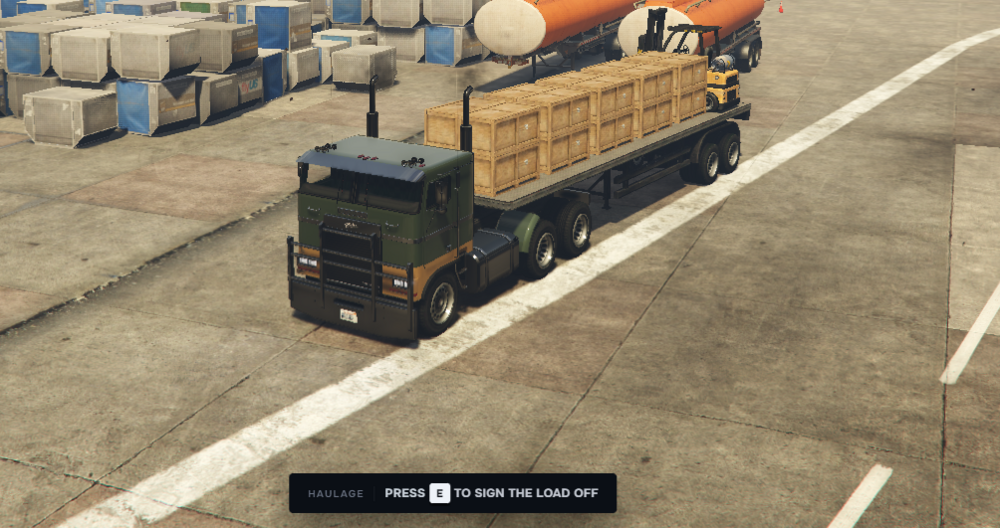
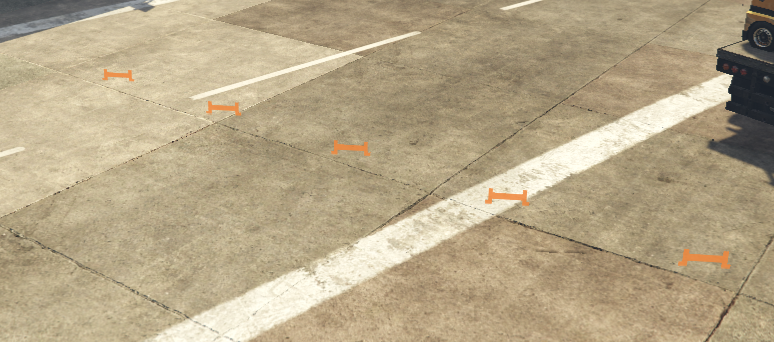
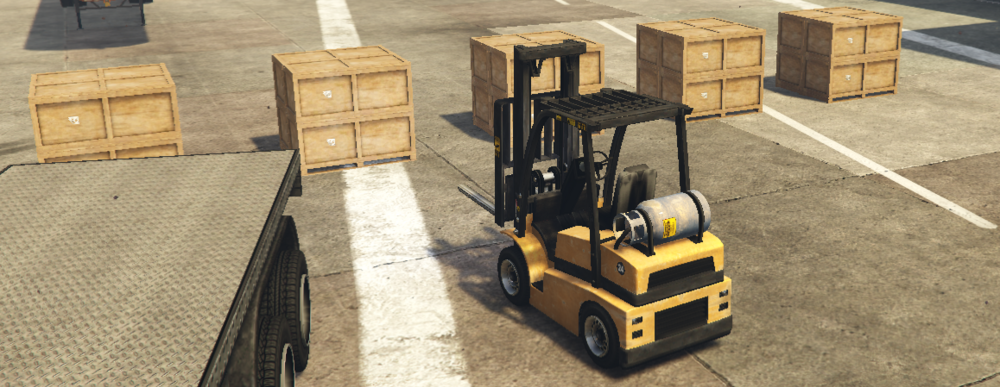
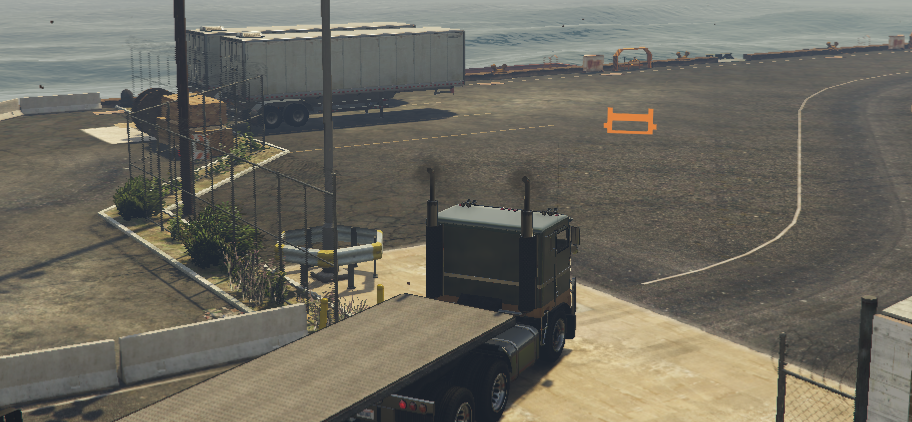
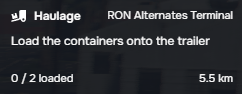
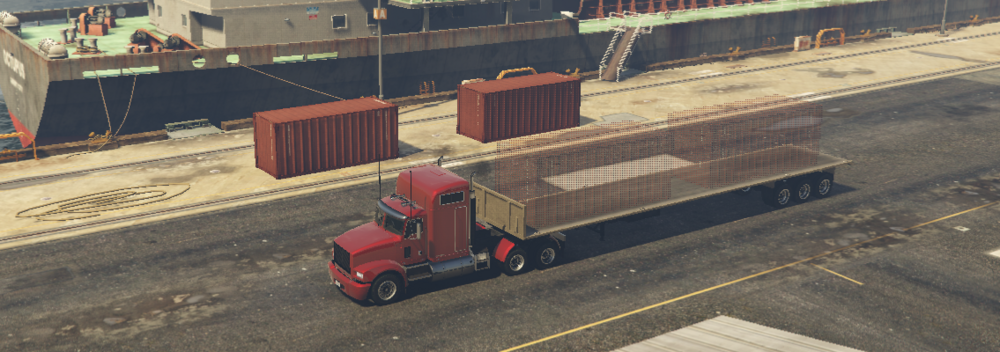
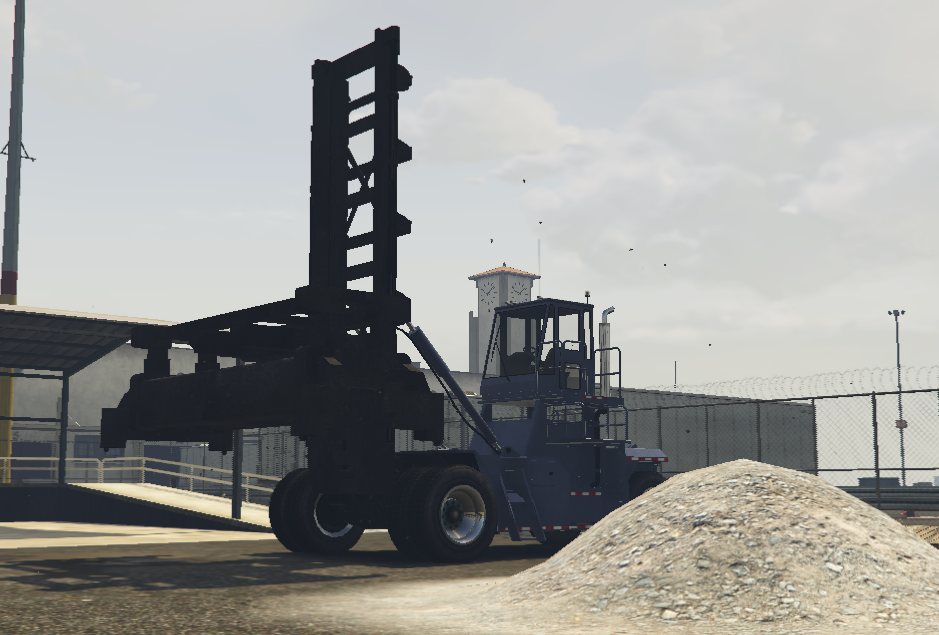
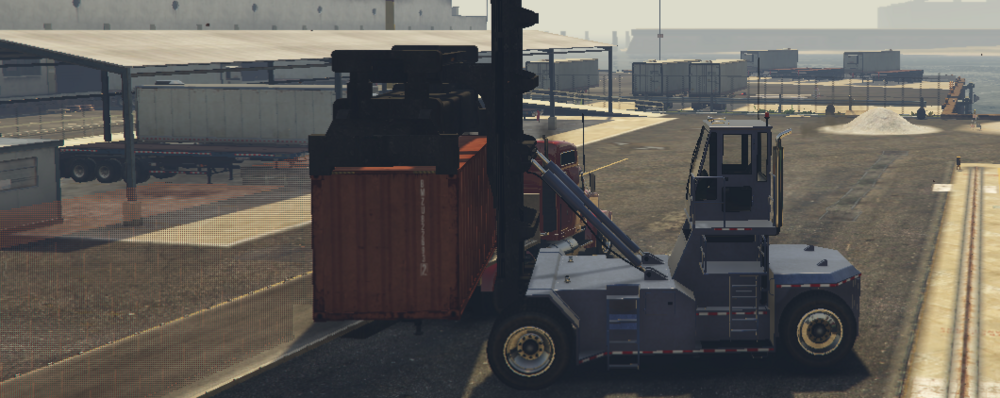
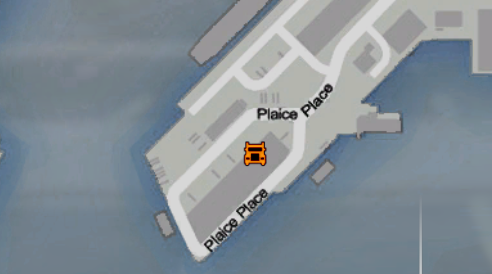
Roleplay Project · TRUCKER Job GUIDE [Picky 1108/26.01] Welcome to the Trucker Job on the RPP Server! The Trucker Job is a transport and logistics profession where players take on the role of a professional truck driver, delivering cargo across Los Santos and beyond. Starting with basic deliveries, drivers can gain experience, increase their job level, unlock new routes, and take on more demanding transportation contracts. Whether you're looking for a dependable way to earn money, want to build your career as a professional trucker, or simply enjoy exploring the roads while hauling different types of cargo, this guide will cover everything you need to know about the job. The Trucker Job features a progression system where new drivers begin with simpler assignments and gradually work their way toward longer routes, heavier loads, specialized cargo, and more rewarding contracts. As your experience grows, you'll gain access to better opportunities and more challenging deliveries. Each stage of the job introduces new routes, cargo types, requirements, and potential rewards. Some deliveries may require specific trucks or equipment, while others will test your ability to safely transport cargo over longer distances while maintaining efficiency and accuracy. As you advance through the ranks, you'll encounter more difficult routes, higher-value cargo, increased payouts, and additional responsibilities. Successful deliveries will help you build your reputation as a reliable driver and progress further within the trucking profession. What this guide covers: 🚛 How to start and work the Trucker Job 📈 How the trucker level and progression system works 📦 Basic cargo and delivery routes HOW TO START AND WORK THE TRUCKER JOB Before beginning your career as a Trucker, there are a few requirements and roleplay standards you must keep in mind. This job is built around realistic transportation and logistics work, so players are expected to portray the role appropriately and maintain a believable appearance and behavior throughout their shift. Suitable work clothing and appropriate footwear MUST be worn while working as a Trucker. When operating a truck, you are expected to maintain realistic roleplay and dress appropriately for the work you are performing. Professional truck driving involves long hours on the road, loading and unloading cargo, and working around heavy vehicles and transportation equipment. Your character should therefore be dressed as an actual professional truck driver would be. For example: 👕 Appropriate work clothing should be worn. 👞 Suitable and practical footwear must be worn. 🦺 High-visibility or safety clothing should be worn when required for loading, unloading, or working around the truck. 🧤 Protective equipment should be used when the delivery or cargo requires it. 🚫 Avoid wearing sportswear, suits, expensive formal clothing, or other outfits that would be unrealistic for professional trucking. 🚛 Do not operate a heavy truck while dressed in clothing that would not reasonably be worn by a professional truck driver. Your roleplay portrayal should remain realistic at all times. You cannot reasonably expect to operate a large commercial truck while wearing a designer suit, expensive formal clothing, or a sports outfit. Dress and behave as someone who is actually performing professional transportation work. This is not only about following the clothing requirement — it is about maintaining the overall roleplay quality and realism of the job. Treat your deliveries, vehicle, cargo, and responsibilities as you would if you were working as a real truck driver. Once you have met the requirements and arrived at the job location, you will be assigned a dedicated trucking vehicle for your shift. Before beginning your route, make sure you are familiar with the truck you will be operating. Keep in mind that you are driving a large commercial vehicle designed to transport cargo, not a standard passenger vehicle. Your driving style should reflect the truck's size, weight, and purpose. When operating your truck: Drive responsibly and realistically. Take the truck's size and handling into consideration. Allow yourself enough space when turning, stopping, and changing lanes. Avoid reckless, aggressive, or unnecessary driving. Do not treat the truck like a sports car or ordinary vehicle. Follow traffic laws and normal road etiquette. Maintain realistic roleplay while travelling between delivery locations. Be mindful of pedestrians, other drivers, and surrounding traffic. Drive according to the type of cargo you are transporting. The goal is to portray an actual professional truck driver completing a delivery route, rather than simply using the truck as a means of travelling from one location to another. Your driving, behaviour, and overall roleplay should reflect the responsibilities that come with operating a commercial vehicle. 📍 Finding the Trucker Job Location To begin your shift, you must first travel to the designated Trucker job location. On the map, look for the yellow Trashmaster truck icon: Once you arrive at the location, you can begin your trucker job. The exact procedure for starting your shift will be explained in the next step of this guide. From this point onward, you’ll be able to begin your trucking duties, access your assigned vehicle, choose from the available contracts and routes, and start delivering cargo throughout Los Santos. Once you arrive at the Trucker Job location, press E while standing at the job marker to open the Trucking Depot menu. This menu is where you’ll find all currently available contracts. Each contract will provide information about the available route and delivery, allowing you to choose the job you want to complete. After selecting a contract, you’ll be able to collect your assigned truck, follow the designated route, and begin your delivery. The menu will appear as follows: The Trucker Job features a ranking system that allows you to progress through different levels as you gain experience (XP) from completing trucking contracts and deliveries. You will start at Level 1 and can progress through the ranks by earning XP. The more deliveries you complete, the more experience you’ll gain and the higher your rank will become. Level 1 - 0 XP Level 2 - 400 XP Level 3 - 1,200 XP Level 4 - 3,000 XP Level 5 - 6,500 XP Your current XP and rank will determine which level of progression you have reached within the Trucker Job. As you continue completing contracts and gaining experience, you’ll advance through the ranking system and unlock access to higher levels of trucking progression. I. Palletised Freight (Level 0 – Level 3) Palletised Freight is one of the first freight options available to you as a trucker. This contract focuses on transporting palletised cargo using a forklift to load and unload the crates. ⓘ The entire route takes approximately 20-25 minutes when completed with proper roleplay I.II. Starting the Contract Once you select Palletised Freight, a forklift will automatically spawn at the starting location. You will need to take this forklift with you throughout the job, as it will be used to load and unload all of the crates. Shortly after starting the contract, you will also receive a process notification. This box will display your current task and show you what you need to do next. INFORMATION MENU ON YOUR RIGHT SIDE OF THE SCREEN -> I.III. Preparing Your Truck After accepting the contract, make your way to your assigned truck. Get inside and drive toward the back side of the warehouse, where your cargo is waiting to be loaded. Position your truck carefully and park it in a suitable location that gives you enough space to operate the forklift around the vehicle. Make sure the truck is positioned properly before beginning the loading process. A good parking position will make loading the crates much easier and more efficient. I.IV. Loading the Crates Once your truck is parked, exit the vehicle and get into your forklift. Drive the forklift toward the crates that need to be loaded onto your truck. As you approach a crate, an interaction message will appear, allowing you to pick it up. Press E to load the crate onto your forklift. Once the crate has been picked up, carefully drive the forklift toward your truck. Position yourself correctly next to the truck and use the interaction prompt to place the crate onto the truck. Press E again to load the crate onto your truck. Repeat this process one crate at a time until all of the required crates have been loaded. ROLEPLAY NOTE: Make sure to properly roleplay the loading process. Take your time when operating the forklift and avoid rushing through the interactions! I.V. Securing the Forklift Once all of the crates have been loaded, you will need to take the forklift with you for the unloading process at your destination. Drive the forklift toward your truck and position it at the designated loading area. When you are close enough to the truck, an interaction prompt will appear. Press E to secure the forklift on top of the truck. ⓘ IMPORTANT: Do not leave the forklift! You will need it at the unloading location to unload the cargo! I.VI. Driving to the Delivery Location Once your forklift is secured and everything is ready, it's time to head toward the unloading location. The destination will be clearly marked on your map/GPS, so follow the route to the designated delivery point. Drive safely and remember to properly roleplay your journey. This contract is designed to be completed as a realistic trucking job rather than simply rushing from one location to another. I.VII. Arriving at the Unloading Location Once you arrive at the unloading location, you will receive a notification informing you that you can begin unloading your cargo. After receiving the notification, exit your truck. You will then need to unload your forklift from the truck. Approach the truck and press E when the interaction prompt appears to unload the forklift. Once the forklift is unloaded, you can begin unloading the crates. I. VIII. Unloading the Crates After unloading the forklift, you will notice information icons showing you where the cargo needs to be delivered. Take your forklift and drive toward the designated unloading areas. Approach the required crate and use the interaction prompt to pick it up. Press E to load the crate onto your forklift. Carefully drive the crate to the designated unloading location. Once you are in the correct position, press E to unload the crate. Continue this process until all of the crates have been successfully unloaded.Remember to take your time and properly roleplay the use of the forklift throughout the entire process. I.IX. Loading the Forklift Back Onto the Truck Once all of the cargo has been unloaded, your job at the delivery location is almost complete. Before leaving, you must load the forklift back onto your truck. Drive the forklift back toward your truck and position it in the designated area. When the interaction prompt appears, press E to load the forklift back onto the truck. Make sure the forklift is properly secured before leaving the delivery location. I.X. Returning to the Starting Location With the cargo successfully delivered and the forklift secured, it's time to return to the original job location. Follow the route displayed on your map and drive back to the starting area. Once you arrive, look for the orange mission marker. Drive your truck into the orange marker and press E to complete the contract. After completing the interaction, your Palletised Freight contract will be successfully completed and you will receive the appropriate rewards and XP. II. Container Transfer (Level 3+) Container Transfer is the second freight sector available to truckers, becoming accessible once you reach Level 3. Compared to Palletised Freight, this contract introduces a different truck, a larger loading area, and specialized machinery for handling shipping containers. The job requires you to carefully load the containers onto your trailer, transport them to the assigned destination, unload them, and return to the depot to complete your shift. ⓘ The entire route takes approximately 40-45 minutes when completed with proper roleplay INFORMATION MENU ON YOUR RIGHT SIDE OF THE SCREEN -> II.I. Selecting Container Transfer Open the Trucker Job menu the same way you did when selecting your first freight contract. From the available delivery options, select Container Transfer. Once selected, you will receive a different truck specifically designed for transporting containers. II.II. Driving to the Loading Area After receiving your truck, drive toward the designated container loading area. The loading location is larger than the one used for Palletised Freight and features specialized equipment designed specifically for moving shipping containers. Position your truck and trailer carefully inside the loading area. Make sure you leave enough space around your trailer so the loading machinery can easily access it and place the containers correctly. ⓘ ROLEPLAY TIP: Take your time when positioning your trailer. Proper parking will make the container loading process much easier and more realistic. II.III. Loading the Containers Once your truck is positioned correctly, exit the vehicle and make your way to the container loading machine. This machinery will be used to pick up and place the containers onto your trailer. Approach the loading machine and begin the loading process. Just like with the previous freight sector, follow the interaction prompts and press E when prompted to pick up and load the containers. Carefully position the loading machine over the trailer and place the container in the designated position. Repeat the process until all required containers have been loaded onto your trailer. ⓘ IMPORTANT: Unlike the Palletised Freight contract, you do not need to load the container loading machine onto your truck. The machine is too large to be transported and will remain at the loading facility once you have finished loading your containers. II.IV. Preparing for Delivery Once all containers have been loaded, return to your truck and check your map for the assigned delivery location. The destination for Container Transfer is not fixed. This means that the delivery location can change from one contract to another, so always check your map after loading your containers to see where your current delivery is located. Once you have identified your destination, get behind the wheel and begin your journey. Follow the GPS and drive carefully toward the assigned delivery location. II.V. Arriving at the Delivery Location When you arrive at the designated delivery location, position your truck in the appropriate area. Once you are in position, you will be able to interact with the delivery point. Press E to sign off and confirm the delivery of your load. After signing off the load, you will be able to begin the container unloading process. II.VI. Unloading the Containers Once the delivery has been confirmed, follow the prompts provided at the unloading location. The containers will then be unloaded from your trailer using the available equipment. Follow the same general procedure used during the previous freight contract: approach the required interaction point and press E whenever prompted. Continue the process until all containers have been successfully unloaded. Once the entire load has been delivered, your delivery portion of the contract is complete. II.VII. Returning to the Depot With all containers successfully unloaded, it's time to return to the Trucker Job depot. Follow the route displayed on your map and drive back to the depot. Once you arrive, enter the designated completion area and follow the interaction prompt to finish your contract. After completing the final interaction, your Container Transfer contract will be completed, and you will receive your payment and XP for the completed delivery. ! Your shift starts here! Put on your uniform, get behind the wheel, and hit the road. Every delivery completed, every container transported, and every route finished brings you one step closer to becoming one of Los Santos' most reliable truckers. Stay safe, drive responsibly, and keep those deliveries moving! [Picky 1108/26.01]

-
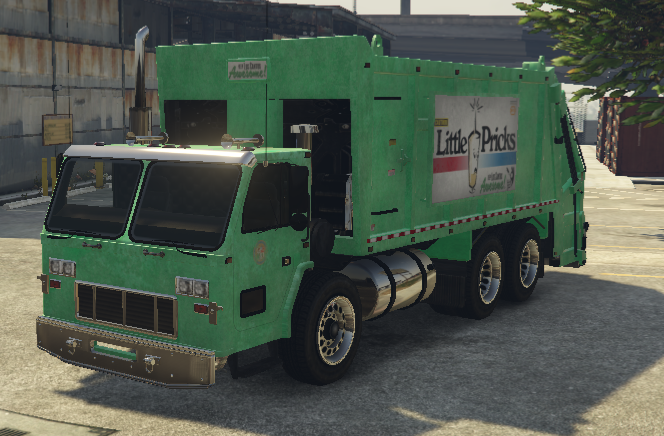
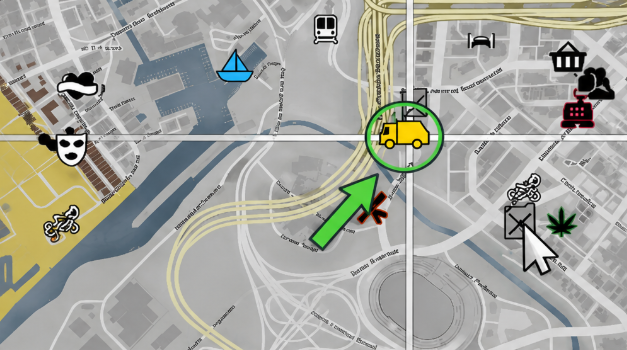
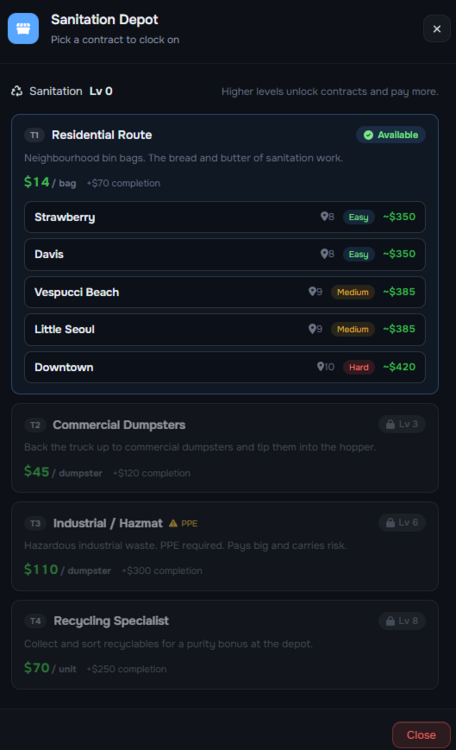
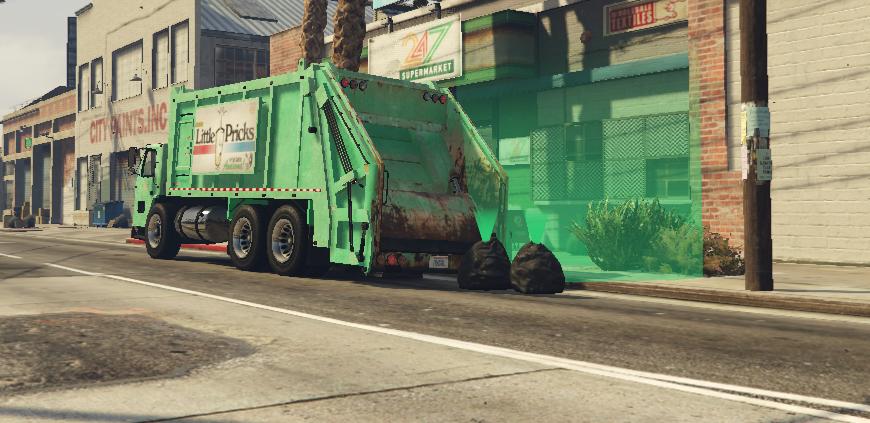
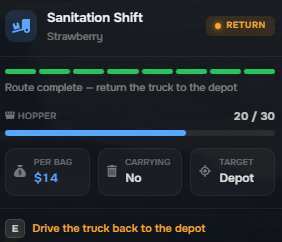
Roleplay Project · Trashmaster Job GUIDE [Picky 1108/26.01] Welcome to the Trashmaster Job on the RPP Server! The Trashmaster job is a sanitation and waste-management profession where players take on the responsibility of keeping Los Santos clean. Starting from basic residential garbage collection, employees can build experience, increase their job level, and eventually gain access to more advanced and specialized waste-management routes. Whether you're looking for a reliable way to earn money, want to work your way through the Trashmaster progression system, or simply enjoy driving around Los Santos while keeping the city clean, this guide will walk you through everything you need to know. The job is divided into several stages of progression, with each stage introducing different types of waste, routes, challenges, and rewards. New employees begin at Level 0, working on Residential Routes, and can progress toward more advanced assignments such as Commercial Dumpsters, Industrial / Hazmat, and Recycling Specialist work. As you progress, you'll encounter different route difficulties, higher payouts, additional requirements, and specialized mechanics. Some assignments may require specific equipment or careful handling, while others reward accuracy and efficiency. What this guide covers: 🗑️ How to start and work the Trashmaster job 📈 How the job's level progression works 🏘️ Residential garbage collection 🏢 Commercial dumpster collection ☣️ Industrial and Hazmat waste ♻️ Recycling and sorting How to start and work the Trashmaster job Before beginning your career as a Trashmaster, there are a few requirements and roleplay standards you must keep in mind. This job is designed around realistic sanitation work, so players are expected to portray the role appropriately and maintain a believable appearance and behavior throughout their shift. 👕 Dress Appropriately for the Job High visibility clothing, protective footwear and gloves MUST be worn at all times. When working as a Trashmaster, you are expected to maintain realistic roleplay and dress appropriately for the work you are performing. Trash collection is a physically demanding job carried out around heavy machinery, garbage, roads, and potentially hazardous materials. Your character should therefore be dressed as an actual sanitation worker would be. For example: 🦺 High-visibility work clothing should be worn. 🥾 Appropriate protective footwear must be worn. 🧤 Protective gloves must be worn. 👷 Your overall appearance should be suitable for sanitation work. 🚫 Avoid wearing sportswear, suits, expensive formal clothing, or other outfits that would be unrealistic for the job. 🚫 Do not operate the Trashmaster while dressed in clothing that would not reasonably be worn by a sanitation worker. Your roleplay portrayal should remain realistic at all times. You cannot reasonably expect to operate a large garbage truck while wearing a designer suit, expensive formal clothing, or a sports outfit. Dress and behave as someone who is actually performing sanitation work. This is not only about following the clothing requirement — it is about maintaining the overall roleplay quality and realism of the job. Once you have met the requirements and arrived at the job location, you will be operating a dedicated Trashmaster vehicle. This is the vehicle you will be operating during your Trashmaster shifts: Make sure you are familiar with the vehicle before beginning your route. Remember that you are operating a large commercial garbage truck, not a normal passenger vehicle, so your driving should reflect its size and purpose. When driving the Trashmaster: Drive responsibly and realistically. Take the vehicle's size into consideration. Avoid reckless or unnecessary driving. Do not treat the garbage truck like a sports car. Follow normal traffic laws and road etiquette. Maintain realistic roleplay while travelling between collection locations. Be mindful of pedestrians and other road users. The goal is to portray an actual sanitation worker completing their daily route, rather than simply using the vehicle as a means of getting from one location to another. 📍 Finding the Trashmaster Job Location To begin your shift, you must first travel to the designated Trashmaster job location. On the map, look for the yellow Trashmaster truck icon: \ When checking the list of locations on your map, the job will appear as ( This is the location where you will go to begin your Trashmaster shift): : Once you arrive at the Davis Waste Management location, you can proceed with starting your job. The exact interaction/start procedure will be explained in the next step of this guide. From this point onward, you will be able to begin your Trashmaster duties, obtain your assigned vehicle, select your available route, and start collecting waste throughout Los Santos. Once you arrive at the Trashmaster job location, press E at the job marker to open the Sanitation Depot menu. This menu is where you will see the contracts currently available to you. It will be displayed like this: At Level 0, as shown in the picture, only the T1 — Residential Route is available. Higher-level contracts remain locked until you progress through the Sanitation job. The Residential Route gives you several route options, each with a different difficulty, number of pickup points, estimated payout, and overall travel time. For this guide, we will begin with the Easy route. 🟢 Easy Routes Easy routes are designed to be the quickest and simplest option. The pickup points are generally close to one another, meaning you will spend less time driving between locations and can complete the route more efficiently. As shown in the menu, Easy routes currently have 8 pickup points. Strawberry — 8 pickups — ~$350 Davis — 8 pickups — ~$350 🟡 Medium Routes Medium routes contain 9 pickup points and require more driving than Easy routes. The pickup locations are further apart, meaning you will spend more time travelling between each stop. The additional distance and extra pickup mean that these routes take longer to complete, but they also provide a higher payout. Vespucci Beach — 9 pickups — ~$385 Little Seoul — 9 pickups — ~$385 🔴 Hard Routes Hard routes contain 10 pickup points and are the longest Residential Routes currently available. The locations are further apart and you will need to spend more time travelling between pickups. However, Hard routes provide the highest payout of the three difficulty levels. Downtown — 10 pickups — ~$420 The general rule is simple: the harder and longer the route, the more you can earn. However, a higher-paying route will also require more time and more driving. 🚛 Take Care of Your Vehicle While working your route, drive carefully and look after the Trashmaster you are operating. Any damage sustained by your work vehicle can negatively affect the income you receive from the route. Therefore, reckless driving, collisions, and unnecessary damage can directly reduce your earnings. Treat the Trashmaster like a real commercial vehicle: Drive carefully between pickup locations. Avoid unnecessary collisions. Be mindful of other vehicles and pedestrians. Don't drive recklessly simply because you are trying to finish faster. Take extra care when reversing or manoeuvring the truck. Keep the vehicle in good condition throughout your route. ⓘ Remember: finishing a route quickly is not necessarily more profitable if you damage the truck along the way. Drive safely, complete your pickups, and protect your earnings. Collecting Trash Bags Once you have selected your route and started your shift, your first pickup location will be marked for you. Follow the route to the designated pickup point and look for the trash bags marked with a green blip. The green blip indicates your current objective and shows you exactly where the garbage needs to be collected. 📍 1. Arrive at the Pickup Point When you arrive at the first location, you will find the designated trash bags near the green pickup area. Before getting out of your vehicle, make sure you position the Trashmaster correctly. 🚛 Park the Trashmaster Properly The Trashmaster loads garbage from the rear of the vehicle, so you need to park in a position that gives you enough space to work from the back. Try to: Park close enough to the trash bags to make the collection convenient. Keep the rear of the Trashmaster facing the pickup area. Avoid parking at an angle that makes it difficult to reach the rear of the truck. Do not block the road unnecessarily. Take your surroundings and other road users into consideration. Proper parking will make the collection process much easier and will also help maintain realistic roleplay. ⚠️ Important: Do not simply stop wherever you happen to be. Remember that you are operating a large garbage truck, and positioning the vehicle correctly is part of realistically performing the job. 🗑️ 2. Collect the Trash Bag Once the Trashmaster is parked correctly, approach the trash bag marked with the green blip. Stand close to the bag and press E to pick it up. After pressing E, your character will pick up the trash bag and you can carry it toward the rear of the Trashmaster. 🚮 3. Throw the Bag Into the Trashmaster Once you have picked up the garbage bag, carry it to the rear of the Trashmaster. Make sure you are positioned correctly at the loading area, then press E again to throw the trash bag into the truck. 🔄 4. Continue to the Next Pickup Once the first trash bag has been loaded, continue following your route to the next pickup location. Repeat the same process at every stop: 📍 Follow the marker → 🚛 Park correctly → 🗑️ Pick up the bag → E → 🚮 Throw it into the Trashmaster → E → ➡️ Continue to the next location. Progress bar will show you, how many pick-up points you have to do: Continue until all pickup points on your selected route have been completed. Once you have successfully collected all of the trash bags required for your selected route, your collection portion of the job is complete. Open your map and follow the yellow blip to the designated return location. This is the location where you will finish your Trashmaster route. Drive your Trashmaster back to the marked area and position the vehicle appropriately. Take care when returning to the depot. Your vehicle can still be damaged while travelling back, and vehicle damage can affect the amount of money you receive. 🟡 2. Enter the Payment Area Once you arrive at the yellow marker, make sure you are inside the designated area. You will then be able to interact with the completion point. 💵 3. Collect Your Payment When you are at the yellow blip, press E to complete the route and collect your payment. Your earnings will then be awarded for successfully completing the route. The amount you receive depends on the route you selected and may be affected by the condition of your Trashmaster. How the job's level progression works The Trashmaster job uses an XP-based leveling system. You start at Sanitation Level 0 and earn XP by completing contracts. Each level requires 500 XP to reach the next one. 🔓 Contract Unlocks: Level 0 — 🗑️ Residential Route Level 3 — 🏢 Commercial Dumpsters Level 6 — ☣️ Industrial / Hazmat — PPE required Level 8 — ♻️ Recycling Specialist As your level increases, you unlock new contracts with different mechanics and higher potential earnings. 500 XP is required for every level, so simply continue completing available contracts to progress through the Sanitation ranks. ⓘ 🏢 Commercial Dumpsters & ☣️ Industrial / Hazmat - you do not need to exit your Trashmaster! Simply drive to the designated dumpster location, position your vehicle correctly, and press E to honk. The dumpster will be handled automatically, allowing you to continue to the next location. ♻️ Recycling Specialist The Recycling Specialist contract works differently. For this contract, you must exit the vehicle because you need to physically collect the recycling bags. You will need to: Park the vehicle properly. Exit the Trashmaster. Collect the designated bags. Load them as required. Continue to the next collection point. Your shift starts here! Put on your uniform, get behind the wheel, and do your part to keep Los Santos clean. Every bag collected, every dumpster emptied, and every route completed brings you one step closer to becoming a Trashmaster. [Picky 1108/26.01]

-
Yeah, just thought of it, it's really amazing idea!
-
-
At the moment, this isn't implemented yet. As far as I know, you can only choose the model. All available pictures can be found in the UCP, and you can browse them there.
-
Best of luck with it! Hope you take it far! ❤️
-
It would be awesome to add additional vehicles on the table but, we have to wait a little! +1 tho.
-
Agreed. +1
-
-
+1
-
You will have it ❤️
-
First of all, thank you for all the work that's gone into the dealership so far! I know adding and configuring vehicles takes a lot of time, and I really appreciate the effort. I have one big suggestion regarding the dealership inventory. I'm not completely sure which of these vehicles are already available and which ones are still missing, so apologies if some of them have already been added. It would be amazing if the developers could review this list and consider adding any of the missing options over time. Having a larger variety of vehicles gives players more choices, makes dealerships feel much more alive, and allows different RP characters to find vehicles that actually fit their personalities and lifestyles instead of everyone driving the same handful of cars. Willard Willard – https://gtacars.net/?search=Willard%20Willard Willard Solair – https://gtacars.net/?search=Willard%20Solair Willard Marbelle – https://gtacars.net/?search=Willard%20Marbelle Emperor Lokus – https://gtacars.net/?search=Emperor%20Lokus Dundreary Admiral – https://gtacars.net/?search=Dundreary%20Admiral Albany Buccaneer Luxe – https://gtacars.net/?search=Albany%20Buccaneer%20Luxe Declasse Walton L35 – https://gtacars.net/?search=Declasse%20Walton%20L35 Declasse Walton L35 Off-Road Package – https://gtacars.net/?search=Declasse%20Walton%20L35%20Off-Road%20Package Vulcar Nebula Wagon – https://gtacars.net/?search=Vulcar%20Nebula%20Wagon Bravado Greenwood – https://gtacars.net/?search=Bravado%20Greenwood Rat Truck – https://gtacars.net/?search=Rat%20Truck Willard Idaho – https://gtacars.net/?search=Willard%20Idaho Dundreary Admiral Classic – https://gtacars.net/?search=Dundreary%20Admiral%20Classic Albany Esperanto – https://gtacars.net/?search=Albany%20Esperanto Dinka Hakumai – https://gtacars.net/?search=Dinka%20Hakumai Declasse Premier Classic – https://gtacars.net/?search=Declasse%20Premier%20Classic Declasse Premier SS – https://gtacars.net/?search=Declasse%20Premier%20SS Dinka Chavos – https://gtacars.net/?search=Dinka%20Chavos Bravado Recursion – https://gtacars.net/?search=Bravado%20Recursion Declasse Yosemite Rancher – https://gtacars.net/?search=Declasse%20Yosemite%20Rancher Albany Manana Custom – https://gtacars.net/?search=Albany%20Manana%20Custom Dundreary Landstalker XL – https://gtacars.net/?search=Dundreary%20Landstalker%20XL BF Glendale Custom – https://gtacars.net/?search=BF%20Glendale%20Custom BF Club – https://gtacars.net/?search=BF%20Club Vapid Peyote Custom – https://gtacars.net/?search=Vapid%20Peyote%20Custom Vapid Razor – https://gtacars.net/?search=Vapid%20Razor Vapid Sadler Retro Sport Crew Cab – https://gtacars.net/?search=Vapid%20Sadler%20Retro%20Sport%20Crew%20Cab Vapid Sadler Retro Sport LWB – https://gtacars.net/?search=Vapid%20Sadler%20Retro%20Sport%20LWB Vapid Sadler Retro Sport SWB – https://gtacars.net/?search=Vapid%20Sadler%20Retro%20Sport%20SWB Burgerfahrze Furzen – https://gtacars.net/?search=Burgerfahrze%20Furzen Dynasty – https://gtacars.net/?search=Dynasty Nebula – https://gtacars.net/?search=Nebula Classic Zion – https://gtacars.net/?search=Classic%20Zion Pegassi Faggio – https://gtacars.net/?search=Pegassi%20Faggio Bravado Rat Loader – https://gtacars.net/?search=Bravado%20Rat%20Loader Emperor (Rusty) – https://gtacars.net/?search=Emperor%20Rusty Declasse Asea – https://gtacars.net/?search=Declasse%20Asea Declasse Rancher XL – https://gtacars.net/?search=Declasse%20Rancher%20XL Albany Emperor – https://gtacars.net/?search=Albany%20Emperor Karin Asterope – https://gtacars.net/?search=Karin%20Asterope Cheval Picador – https://gtacars.net/?search=Cheval%20Picador Willard Faction – https://gtacars.net/?search=Willard%20Faction Albany Primo – https://gtacars.net/?search=Albany%20Primo Bodhi – https://gtacars.net/?search=Bodhi Vapid Slamvan – https://gtacars.net/?search=Vapid%20Slamvan Declasse Voodoo – https://gtacars.net/?search=Declasse%20Voodoo Vulcar Ingot – https://gtacars.net/?search=Vulcar%20Ingot Willard Faction Custom – https://gtacars.net/?search=Willard%20Faction%20Custom Weeny Issi – https://gtacars.net/?search=Weeny%20Issi Maibatsu Penumbra – https://gtacars.net/?search=Maibatsu%20Penumbra Dundreay Virgo Classic – https://gtacars.net/?search=Dundreay%20Virgo%20Classic Vapid Slamvan (Lost) – https://gtacars.net/?search=Vapid%20Slamvan%20Lost Karin Rebel – https://gtacars.net/?search=Karin%20Rebel Vapid Bobcat XL – https://gtacars.net/?search=Vapid%20Bobcat%20XL Dinka Blista Compact – https://gtacars.net/?search=Dinka%20Blista%20Compact Bravado Youga – https://gtacars.net/?search=Bravado%20Youga Declasse Moonbeam – https://gtacars.net/?search=Declasse%20Moonbeam Brute Pony – https://gtacars.net/?search=Brute%20Pony Declasse Voodoo Custom – https://gtacars.net/?search=Declasse%20Voodoo%20Custom Imponte Ruiner – https://gtacars.net/?search=Imponte%20Ruiner Ubermacht Oracle XS – https://gtacars.net/?search=Ubermacht%20Oracle%20XS Declasse Vigero – https://gtacars.net/?search=Declasse%20Vigero Declasse Premier – https://gtacars.net/?search=Declasse%20Premier Karin Futo – https://gtacars.net/?search=Karin%20Futo Schyster Fusilade – https://gtacars.net/?search=Schyster%20Fusilade Imponte Phoenix – https://gtacars.net/?search=Imponte%20Phoenix Ubermacht Oracle – https://gtacars.net/?search=Ubermacht%20Oracle Moonbeam Custom – https://gtacars.net/?search=Moonbeam%20Custom Willard Faction Custom Donk – https://gtacars.net/?search=Willard%20Faction%20Custom%20Donk Buccaneer Custom – https://gtacars.net/?search=Buccaneer%20Custom Virgo Classic Custom – https://gtacars.net/?search=Virgo%20Classic%20Custom Vapid Chino Custom – https://gtacars.net/?search=Vapid%20Chino%20Custom Hermes – https://gtacars.net/?search=Hermes Sabre Turbo Custom – https://gtacars.net/?search=Sabre%20Turbo%20Custom Vapid Fortune – https://gtacars.net/?search=Vapid%20Fortune Maibatsu Vincent – https://gtacars.net/?search=Maibatsu%20Vincent Imponte Phoenix 455 RS – https://gtacars.net/?search=Imponte%20Phoenix%20455%20RS Imponte DF8-90 – https://gtacars.net/?search=Imponte%20DF8-90 Dinka Perennial – https://gtacars.net/?search=Dinka%20Perennial Annis Pinnacle – https://gtacars.net/?search=Annis%20Pinnacle Albany Cavalcade FXT – https://gtacars.net/?search=Albany%20Cavalcade%20FXT Vapid Contender Sport – https://gtacars.net/?search=Vapid%20Contender%20Sport Canis Mesa 2023 – https://gtacars.net/?search=Canis%20Mesa%202023 Vulcar Zodiac – https://gtacars.net/?search=Vulcar%20Zodiac Declasse Vigero Rumbler – https://gtacars.net/?search=Declasse%20Vigero%20Rumbler Declasse Tahoma Coupe – https://gtacars.net/?search=Declasse%20Tahoma%20Coupe Willard Eudora – https://gtacars.net/?search=Willard%20Eudora Classique Broadway – https://gtacars.net/?search=Classique%20Broadway Karin Boor – https://gtacars.net/?search=Karin%20Boor Albany Primo LX – https://gtacars.net/?search=Albany%20Primo%20LX Willard Elegant – https://gtacars.net/?search=Willard%20Elegant Karin Atlas – https://gtacars.net/?search=Karin%20Atlas Karin Asterope RS – https://gtacars.net/?search=Karin%20Asterope%20RS Karin Dilettante DX – https://gtacars.net/?search=Karin%20Dilettante%20DX Vapid Dominator GTT – https://gtacars.net/?search=Vapid%20Dominator%20GTT Vapid Dominator ASP – https://gtacars.net/?search=Vapid%20Dominator%20ASP Classique Tahoma – https://gtacars.net/?search=Classique%20Tahoma Dinka Millennial – https://gtacars.net/?search=Dinka%20Millennial Declasse Merit – https://gtacars.net/?search=Declasse%20Merit Dundreary Landstalker G – https://gtacars.net/?search=Dundreary%20Landstalker%20G Vapid Huntley – https://gtacars.net/?search=Vapid%20Huntley Imponte Beater Dukes – https://gtacars.net/?search=Imponte%20Beater%20Dukes Canis Seminole Frontier – https://gtacars.net/?search=Canis%20Seminole%20Frontier Bravado Youga Classic 4x4 – https://gtacars.net/?search=Bravado%20Youga%20Classic%204x4 Dundreary Regina – https://gtacars.net/?search=Dundreary%20Regina Declasse Rhapsody – https://gtacars.net/?search=Declasse%20Rhapsody Vapid Minivan – https://gtacars.net/?search=Vapid%20Minivan Benefactor Glendale – https://gtacars.net/?search=Benefactor%20Glendale Vapid Stanier – https://gtacars.net/?search=Vapid%20Stanier Vapid Stanier 2 – https://gtacars.net/?search=Vapid%20Stanier%202 Karin Dilettante – https://gtacars.net/?search=Karin%20Dilettante Vapid Tow Truck (Slamvan) – https://gtacars.net/?search=Vapid%20Tow%20Truck%20Slamvan Dinka Blista – https://gtacars.net/?search=Dinka%20Blista Bollokan Prairie – https://gtacars.net/?search=Bollokan%20Prairie Cheval Surge – https://gtacars.net/?search=Cheval%20Surge Vulcar Warrener – https://gtacars.net/?search=Vulcar%20Warrener Cheval Fugitive – https://gtacars.net/?search=Cheval%20Fugitive Bravado Bison Utility – https://gtacars.net/?search=Bravado%20Bison%20Utility Bravado Bison – https://gtacars.net/?search=Bravado%20Bison Zirconium Stratum – https://gtacars.net/?search=Zirconium%20Stratum Albany Cavalcade – https://gtacars.net/?search=Albany%20Cavalcade Karin Intruder – https://gtacars.net/?search=Karin%20Intruder Bravado Rumpo – https://gtacars.net/?search=Bravado%20Rumpo Vapid Dominator – https://gtacars.net/?search=Vapid%20Dominator Declasse Gang Burrito – https://gtacars.net/?search=Declasse%20Gang%20Burrito Vapid Guardian – https://gtacars.net/?search=Vapid%20Guardian Declasse Burrito Sport – https://gtacars.net/?search=Declasse%20Burrito%20Sport Karin Kuruma – https://gtacars.net/?search=Karin%20Kuruma Benefactor Schwartzer – https://gtacars.net/?search=Benefactor%20Schwartzer Hijak Khamelion – https://gtacars.net/?search=Hijak%20Khamelion Vapid Contender – https://gtacars.net/?search=Vapid%20Contender Benefactor Surano – https://gtacars.net/?search=Benefactor%20Surano Buckingham Vestra – https://gtacars.net/?search=Buckingham%20Vestra Buckingham Nimbus – https://gtacars.net/?search=Buckingham%20Nimbus Sea Seagull – https://gtacars.net/?search=Sea%20Seagull RedJet Ferry Red – https://gtacars.net/?search=RedJet%20Ferry%20Red RedJet Ferry Blue – https://gtacars.net/?search=RedJet%20Ferry%20Blue Speedophile Seashark – https://gtacars.net/?search=Speedophile%20Seashark Speedophile Seashark (Two-Tone) – https://gtacars.net/?search=Speedophile%20Seashark%20Two-Tone Shitzu Suntrap – https://gtacars.net/?search=Shitzu%20Suntrap Nagasaki Dinghy (2 Seater) – https://gtacars.net/?search=Nagasaki%20Dinghy%202%20Seater Nagasaki Dinghy (4 Seater) – https://gtacars.net/?search=Nagasaki%20Dinghy%204%20Seater Shitzu Squalo – https://gtacars.net/?search=Shitzu%20Squalo Tug – https://gtacars.net/?search=Tug Shitzu Tropic – https://gtacars.net/?search=Shitzu%20Tropic Pegassi Speeder (Painted Body) – https://gtacars.net/?search=Pegassi%20Speeder%20Painted%20Body Pegassi Speeder (Wooden Body) – https://gtacars.net/?search=Pegassi%20Speeder%20Wooden%20Body Shitzu Jetmax – https://gtacars.net/?search=Shitzu%20Jetmax Dinka Marquis – https://gtacars.net/?search=Dinka%20Marquis Nagasaki Buzzard – https://gtacars.net/?search=Nagasaki%20Buzzard Buckingham Maverick – https://gtacars.net/?search=Buckingham%20Maverick Maibatsu Frogger – https://gtacars.net/?search=Maibatsu%20Frogger Buckingham Swift – https://gtacars.net/?search=Buckingham%20Swift Buckingham SuperVolito – https://gtacars.net/?search=Buckingham%20SuperVolito Buckingham SuperVolito Carbon – https://gtacars.net/?search=Buckingham%20SuperVolito%20Carbon Buckingham Volatus – https://gtacars.net/?search=Buckingham%20Volatus Bravado Feroci – https://gtacars.net/?search=Bravado%20Feroci Invetero Coquette D5 – https://gtacars.net/?search=Invetero%20Coquette%20D5 BF Weevil – https://gtacars.net/?search=BF%20Weevil BF Surfer Custom – https://gtacars.net/?search=BF%20Surfer%20Custom Dinka Kanjo SJ – https://gtacars.net/?search=Dinka%20Kanjo%20SJ Declasse Vigero R – https://gtacars.net/?search=Declasse%20Vigero%20R Übermacht Sentinel Classic Widebody – https://gtacars.net/?search=Ubermacht%20Sentinel%20Classic%20Widebody Grotti Brioso 300 Widebody – https://gtacars.net/?search=Grotti%20Brioso%20300%20Widebody Ubermacht Seraph XS V10 – https://gtacars.net/?search=Ubermacht%20Seraph%20XS%20V10 Bravado Buffalo S Stock – https://gtacars.net/?search=Bravado%20Buffalo%20S%20Stock Bravado Buffalo SX – https://gtacars.net/?search=Bravado%20Buffalo%20SX Bravado Buffalo STX – https://gtacars.net/?search=Bravado%20Buffalo%20STX Karin Previon – https://gtacars.net/?search=Karin%20Previon Pfister Growler – https://gtacars.net/?search=Pfister%20Growler Pfister Comet S2 – https://gtacars.net/?search=Pfister%20Comet%20S2 Karin Calico GTF – https://gtacars.net/?search=Karin%20Calico%20GTF Annis ZR-250 – https://gtacars.net/?search=Annis%20ZR-250 Ubermacht Sentinel SG4 – https://gtacars.net/?search=Ubermacht%20Sentinel%20SG4 Ubermacht Sentinel SG3 Wagon – https://gtacars.net/?search=Ubermacht%20Sentinel%20SG3%20Wagon Ubermacht Sentinel SG3 Sedan – https://gtacars.net/?search=Ubermacht%20Sentinel%20SG3%20Sedan Ubermacht Sentinel SG3 Coupe – https://gtacars.net/?search=Ubermacht%20Sentinel%20SG3%20Coupe Ubermacht Sentinel SG3 Convertible – https://gtacars.net/?search=Ubermacht%20Sentinel%20SG3%20Convertible Ubermacht Sentinel 2013 Sedan – https://gtacars.net/?search=Ubermacht%20Sentinel%202013%20Sedan Ubermacht Sentinel 2013 Coupe – https://gtacars.net/?search=Ubermacht%20Sentinel%202013%20Coupe Bravado Gauntlet V6 – https://gtacars.net/?search=Bravado%20Gauntlet%20V6 Bravado Gauntlet A/C – https://gtacars.net/?search=Bravado%20Gauntlet%20A%2FC Bravado Buffalo Hellhound – https://gtacars.net/?search=Bravado%20Buffalo%20Hellhound Bravado Buffalo A/C – https://gtacars.net/?search=Bravado%20Buffalo%20A%2FC Alamo – https://gtacars.net/?search=Alamo Maibatsu Penumbra FF – https://gtacars.net/?search=Maibatsu%20Penumbra%20FF Bravado Gauntlet Classic Custom – https://gtacars.net/?search=Bravado%20Gauntlet%20Classic%20Custom Vapid Radius – https://gtacars.net/?search=Vapid%20Radius BF Surfer – https://gtacars.net/?search=BF%20Surfer Benefactor Panto – https://gtacars.net/?search=Benefactor%20Panto Karin BeeJay XL – https://gtacars.net/?search=Karin%20BeeJay%20XL Bravado Paradise – https://gtacars.net/?search=Bravado%20Paradise Emperor Habanero – https://gtacars.net/?search=Emperor%20Habanero Albany Buccaneer – https://gtacars.net/?search=Albany%20Buccaneer Declasse Stallion – https://gtacars.net/?search=Declasse%20Stallion Imponte Dukes – https://gtacars.net/?search=Imponte%20Dukes Vapid Blade – https://gtacars.net/?search=Vapid%20Blade Declasse Tampa – https://gtacars.net/?search=Declasse%20Tampa Declasse Sabre Turbo – https://gtacars.net/?search=Declasse%20Sabre%20Turbo Karin Sultan – https://gtacars.net/?search=Karin%20Sultan Bravado Buffalo – https://gtacars.net/?search=Bravado%20Buffalo Bravado Gresley – https://gtacars.net/?search=Bravado%20Gresley Bravado Gauntlet – https://gtacars.net/?search=Bravado%20Gauntlet Ubermeacht Sentinel XS – https://gtacars.net/?search=Ubermeacht%20Sentinel%20XS Ubermacht Sentinel Cabrio – https://gtacars.net/?search=Ubermacht%20Sentinel%20Cabrio Ubermacht Zion – https://gtacars.net/?search=Ubermacht%20Zion Ubermacht Zion Cabrio – https://gtacars.net/?search=Ubermacht%20Zion%20Cabrio Bravado Buffalo S – https://gtacars.net/?search=Bravado%20Buffalo%20S Ocelot Lynx – https://gtacars.net/?search=Ocelot%20Lynx Invetero Coquette – https://gtacars.net/?search=Invetero%20Coquette LCC Krust – https://gtacars.net/?search=LCC%20Krust Ubermacht SG1150 – https://gtacars.net/?search=Ubermacht%20SG1150 Dinka Akuma Classic – https://gtacars.net/?search=Dinka%20Akuma%20Classic Western Reever – https://gtacars.net/?search=Western%20Reever Nagasaki Shinobi – https://gtacars.net/?search=Nagasaki%20Shinobi Western Slave – https://gtacars.net/?search=Western%20Slave LCC Templar – https://gtacars.net/?search=LCC%20Templar Western Wolfsbane 2010 – https://gtacars.net/?search=Western%20Wolfsbane%202010 Western Hellfury – https://gtacars.net/?search=Western%20Hellfury LCS Lycan – https://gtacars.net/?search=LCS%20Lycan Western Diabolus – https://gtacars.net/?search=Western%20Diabolus Western Angel – https://gtacars.net/?search=Western%20Angel Western Freeway – https://gtacars.net/?search=Western%20Freeway Western Revenant – https://gtacars.net/?search=Western%20Revenant Western Soverign 2010 – https://gtacars.net/?search=Western%20Soverign%202010 Western Wintergreen – https://gtacars.net/?search=Western%20Wintergreen Western Wayfarer – https://gtacars.net/?search=Western%20Wayfarer Nagasaki Chimera – https://gtacars.net/?search=Nagasaki%20Chimera Pegassi Faggio Sport – https://gtacars.net/?search=Pegassi%20Faggio%20Sport Western Rat Bike – https://gtacars.net/?search=Western%20Rat%20Bike Dinka Enduro – https://gtacars.net/?search=Dinka%20Enduro LCC Hexer – https://gtacars.net/?search=LCC%20Hexer Shitzu PCJ 600 – https://gtacars.net/?search=Shitzu%20PCJ%20600 Western Zombie Bobber – https://gtacars.net/?search=Western%20Zombie%20Bobber Western Zombie Chopper – https://gtacars.net/?search=Western%20Zombie%20Chopper Shitzu Vader – https://gtacars.net/?search=Shitzu%20Vader Western Bagger – https://gtacars.net/?search=Western%20Bagger Principle Nemesis – https://gtacars.net/?search=Principle%20Nemesis Pegassi Ruffian – https://gtacars.net/?search=Pegassi%20Ruffian Pegassi Esskey – https://gtacars.net/?search=Pegassi%20Esskey Principe Diablous – https://gtacars.net/?search=Principe%20Diablous Western Wolfsbane – https://gtacars.net/?search=Western%20Wolfsbane Western Daemon – https://gtacars.net/?search=Western%20Daemon Nagasaki Carbon RS – https://gtacars.net/?search=Nagasaki%20Carbon%20RS Dinka Double-T – https://gtacars.net/?search=Dinka%20Double-T Western Daemon Custom – https://gtacars.net/?search=Western%20Daemon%20Custom Western Sovereign – https://gtacars.net/?search=Western%20Sovereign LCC Avarus – https://gtacars.net/?search=LCC%20Avarus FCR1000 Custom – https://gtacars.net/?search=FCR1000%20Custom FCR1000 – https://gtacars.net/?search=FCR1000 Western Nightblade – https://gtacars.net/?search=Western%20Nightblade Dinka Akuma – https://gtacars.net/?search=Dinka%20Akuma Western Cliffhanger – https://gtacars.net/?search=Western%20Cliffhanger Gargoyle – https://gtacars.net/?search=Gargoyle Benefactor Feltzer Coupe – https://gtacars.net/?search=Benefactor%20Feltzer%20Coupe Grotti Stinger TT – https://gtacars.net/?search=Grotti%20Stinger%20TT Coil Raiden Z – https://gtacars.net/?search=Coil%20Raiden%20Z Annis S-230 – https://gtacars.net/?search=Annis%20S-230 Pfister Stardust – https://gtacars.net/?search=Pfister%20Stardust Benefactor Dubsta 2022 – https://gtacars.net/?search=Benefactor%20Dubsta%202022 Dewbauchee Rapid GT Cabrio Classic – https://gtacars.net/?search=Dewbauchee%20Rapid%20GT%20Cabrio%20Classic Nagasaki Caddy XL – https://gtacars.net/?search=Nagasaki%20Caddy%20XL Annis R300 – https://gtacars.net/?search=Annis%20R300 Toundra Panthere – https://gtacars.net/?search=Toundra%20Panthere Übermacht Rhinehart – https://gtacars.net/?search=Ubermacht%20Rhinehart Obey Omnis e-GT – https://gtacars.net/?search=Obey%20Omnis%20e-GT Ubermacht Oracle XS LE – https://gtacars.net/?search=Ubermacht%20Oracle%20XS%20LE Declasse Alamo 2600LS – https://gtacars.net/?search=Declasse%20Alamo%202600LS Pfister Astron – https://gtacars.net/?search=Pfister%20Astron Gallivanter Baller ST – https://gtacars.net/?search=Gallivanter%20Baller%20ST Lampadati Cinquemila – https://gtacars.net/?search=Lampadati%20Cinquemila Pfister Comet S2 Cabrio – https://gtacars.net/?search=Pfister%20Comet%20S2%20Cabrio Enus Deity – https://gtacars.net/?search=Enus%20Deity Declasse Granger 3600LX – https://gtacars.net/?search=Declasse%20Granger%203600LX Obey i-Wagen – https://gtacars.net/?search=Obey%20i-Wagen Enus Jubilee – https://gtacars.net/?search=Enus%20Jubilee Benefactor Feltzer – https://gtacars.net/?search=Benefactor%20Feltzer Annis ZR-350 – https://gtacars.net/?search=Annis%20ZR-350 Emperor Vectre – https://gtacars.net/?search=Emperor%20Vectre Obey Tailgater S – https://gtacars.net/?search=Obey%20Tailgater%20S Dinka Jester RR – https://gtacars.net/?search=Dinka%20Jester%20RR Annis Euros – https://gtacars.net/?search=Annis%20Euros Ubermacht Cypher – https://gtacars.net/?search=Ubermacht%20Cypher Ubermacht Cypher Hatchback – https://gtacars.net/?search=Ubermacht%20Cypher%20Hatchback Dewbauchee Vesper – https://gtacars.net/?search=Dewbauchee%20Vesper Karin Patriot Classic – https://gtacars.net/?search=Karin%20Patriot%20Classic Ubermacht Kampfer – https://gtacars.net/?search=Ubermacht%20Kampfer Pfister Comet – https://gtacars.net/?search=Pfister%20Comet Karin Ariant – https://gtacars.net/?search=Karin%20Ariant Declasse Yosemite New Gen (Mod Car) – https://gtacars.net/?search=Declasse%20Yosemite%20New%20Gen Annis ZR-380 (Mod Car) – https://gtacars.net/?search=Annis%20ZR-380 Bravado Gresley Hellhound (Mod Car) – https://gtacars.net/?search=Bravado%20Gresley%20Hellhound Obey Argento (Mod Car) – https://gtacars.net/?search=Obey%20Argento Coil Taranis (Mod Car) – https://gtacars.net/?search=Coil%20Taranis Dinka Flash (Mod Car) – https://gtacars.net/?search=Dinka%20Flash Lampadat Novak – https://gtacars.net/?search=Lampadat%20Novak Enus Paragon – https://gtacars.net/?search=Enus%20Paragon Obey 8F Drafter – https://gtacars.net/?search=Obey%208F%20Drafter Albany Manana – https://gtacars.net/?search=Albany%20Manana Declasse Tornado – https://gtacars.net/?search=Declasse%20Tornado Declasse Tornado Convertible – https://gtacars.net/?search=Declasse%20Tornado%20Convertible Vapid Peyote – https://gtacars.net/?search=Vapid%20Peyote Fathom FQ2 – https://gtacars.net/?search=Fathom%20FQ2 Benefactor Serrano – https://gtacars.net/?search=Benefactor%20Serrano Shitzu Hakuchou – https://gtacars.net/?search=Shitzu%20Hakuchou Albany Cavalcade II – https://gtacars.net/?search=Albany%20Cavalcade%20II Pegassi Bati 801 – https://gtacars.net/?search=Pegassi%20Bati%20801 Invetero Coquette Targa – https://gtacars.net/?search=Invetero%20Coquette%20Targa Mammoth Patriot – https://gtacars.net/?search=Mammoth%20Patriot Benefactor Dubsta – https://gtacars.net/?search=Benefactor%20Dubsta Albany Alpha – https://gtacars.net/?search=Albany%20Alpha Benefactor Dubsta Sport – https://gtacars.net/?search=Benefactor%20Dubsta%20Sport Benefactor XLS – https://gtacars.net/?search=Benefactor%20XLS Enus Huntley S – https://gtacars.net/?search=Enus%20Huntley%20S Obey 9F – https://gtacars.net/?search=Obey%209F Bravado Banshee – https://gtacars.net/?search=Bravado%20Banshee Obey 9F Cabrio – https://gtacars.net/?search=Obey%209F%20Cabrio Annis Elegy Retro – https://gtacars.net/?search=Annis%20Elegy%20Retro Dewbauchee Massacro – https://gtacars.net/?search=Dewbauchee%20Massacro Dinka Jester – https://gtacars.net/?search=Dinka%20Jester Grotti Bestia GTS – https://gtacars.net/?search=Grotti%20Bestia%20GTS Vapid Scout 2020 – https://gtacars.net/?search=Vapid%20Scout%202020 Vapid Contender E109 – https://gtacars.net/?search=Vapid%20Contender%20E109 Bravado Youga Custom – https://gtacars.net/?search=Bravado%20Youga%20Custom Grotti Brioso R/A – https://gtacars.net/?search=Grotti%20Brioso%20R%2FA Vulcar Warrener HKR – https://gtacars.net/?search=Vulcar%20Warrener%20HKR Albany Presidente – https://gtacars.net/?search=Albany%20Presidente Benefactor Schafter 2010 – https://gtacars.net/?search=Benefactor%20Schafter%202010 Albany Presidente C-STR – https://gtacars.net/?search=Albany%20Presidente%20C-STR Vapid Executioner (Mod Car) – https://gtacars.net/?search=Vapid%20Executioner Benefactor Streiter (Mod Car) – https://gtacars.net/?search=Benefactor%20Streiter Annis Kawaii (Mod Car) – https://gtacars.net/?search=Annis%20Kawaii Torrence (Mod Car) – https://gtacars.net/?search=Torrence Scout (Mod Car) – https://gtacars.net/?search=Scout Hellion – https://gtacars.net/?search=Hellion Caracara 2020 (Mod Car) – https://gtacars.net/?search=Caracara%202020 4x4 Caracara – https://gtacars.net/?search=4x4%20Caracara Vapid Chino Classic – https://gtacars.net/?search=Vapid%20Chino%20Classic Bravado Youga Classic – https://gtacars.net/?search=Bravado%20Youga%20Classic Gallivanter Baller – https://gtacars.net/?search=Gallivanter%20Baller Albany Virgo – https://gtacars.net/?search=Albany%20Virgo Obey Tailgater – https://gtacars.net/?search=Obey%20Tailgater Declasse Granger – https://gtacars.net/?search=Declasse%20Granger Dinka Thrust – https://gtacars.net/?search=Dinka%20Thrust Albany Washington – https://gtacars.net/?search=Albany%20Washington Declasse Yosemite – https://gtacars.net/?search=Declasse%20Yosemite Ocelot Jackal – https://gtacars.net/?search=Ocelot%20Jackal Benefactor Schafter – https://gtacars.net/?search=Benefactor%20Schafter Obey Rocoto – https://gtacars.net/?search=Obey%20Rocoto Gallivanter Baller II – https://gtacars.net/?search=Gallivanter%20Baller%20II Gallivanter Baller LE – https://gtacars.net/?search=Gallivanter%20Baller%20LE Gallivanter Baller LE LWB – https://gtacars.net/?search=Gallivanter%20Baller%20LE%20LWB Lampadati Felon – https://gtacars.net/?search=Lampadati%20Felon Lampadati Felon GT – https://gtacars.net/?search=Lampadati%20Felon%20GT Dewbauchee Exemplar – https://gtacars.net/?search=Dewbauchee%20Exemplar Benefactor Schafter V12 – https://gtacars.net/?search=Benefactor%20Schafter%20V12 Dundreary Stretch – https://gtacars.net/?search=Dundreary%20Stretch Ocelot F620 – https://gtacars.net/?search=Ocelot%20F620 Dewbauchee Rapid GT – https://gtacars.net/?search=Dewbauchee%20Rapid%20GT Benefactor Schafter LWB – https://gtacars.net/?search=Benefactor%20Schafter%20LWB Dewbauchee Rapid GT Convertible – https://gtacars.net/?search=Dewbauchee%20Rapid%20GT%20Convertible Enus Cognoscenti Cabrio – https://gtacars.net/?search=Enus%20Cognoscenti%20Cabrio Lampadati Furore GT – https://gtacars.net/?search=Lampadati%20Furore%20GT Grotti Carbonizzare – https://gtacars.net/?search=Grotti%20Carbonizzare Albany Esperanto Taxi – https://gtacars.net/?search=Albany%20Esperanto%20Taxi Vapid Stanier Taxi – https://gtacars.net/?search=Vapid%20Stanier%20Taxi Vapid Victor Taxi – https://gtacars.net/?search=Vapid%20Victor%20Taxi Vulcar Fagaloa Coupe – https://gtacars.net/?search=Vulcar%20Fagaloa%20Coupe Vapid Clique Deluxe – https://gtacars.net/?search=Vapid%20Clique%20Deluxe Vapid Clique Wagon – https://gtacars.net/?search=Vapid%20Clique%20Wagon Bravado Vulture – https://gtacars.net/?search=Bravado%20Vulture Declasse Emperor Altior – https://gtacars.net/?search=Declasse%20Emperor%20Altior Bordeaux Arias – https://gtacars.net/?search=Bordeaux%20Arias Declasse Tulip M-100 – https://gtacars.net/?search=Declasse%20Tulip%20M-10 Weeny Issi Rally – https://gtacars.net/?search=Weeny%20Issi%20Rally Imponte Ruiner ZZ-8 – https://gtacars.net/?search=Imponte%20Ruiner%20ZZ-8 Dinka Postlude – https://gtacars.net/?search=Dinka%20Postlude Benefactor Scheisser – https://gtacars.net/?search=Benefactor%20Scheisser Grotti Brioso 300 – https://gtacars.net/?search=Grotti%20Brioso%20300 Karin Sultan RS Classic – https://gtacars.net/?search=Karin%20Sultan%20RS%20Classic Dinka RT3000 – https://gtacars.net/?search=Dinka%20RT3000 Annis Remus – https://gtacars.net/?search=Annis%20Remus Karin Futo GTX – https://gtacars.net/?search=Karin%20Futo%20GTX Ubermacht Vorstand – https://gtacars.net/?search=Ubermacht%20Vorstand Benefactor Scharmann – https://gtacars.net/?search=Benefactor%20Scharmann Schyster Champion – https://gtacars.net/?search=Schyster%20Champion Karin Everon (Non-Artic) – https://gtacars.net/?search=Karin%20Everon%20Non-Artic Vapid Uranus – https://gtacars.net/?search=Vapid%20Uranus Vapid Victor – https://gtacars.net/?search=Vapid%20Victor Ubermacht Seraph – https://gtacars.net/?search=Ubermacht%20Seraph Burgerfahrze Club GTR – https://gtacars.net/?search=Burgerfahrze%20Club%20GTR Declasse Sabre – https://gtacars.net/?search=Declasse%20Sabre Obey Omnis – https://gtacars.net/?search=Obey%20Omnis Overflod Imorgon – https://gtacars.net/?search=Overflod%20Imorgon Albany V-STR – https://gtacars.net/?search=Albany%20V-STR Ubermacht Rebla GTS – https://gtacars.net/?search=Ubermacht%20Rebla%20GTS Lampadati Komoda – https://gtacars.net/?search=Lampadati%20Komoda Karin Sultan Classic – https://gtacars.net/?search=Karin%20Sultan%20Classic Karin Everon – https://gtacars.net/?search=Karin%20Everon Dinka Sugoi – https://gtacars.net/?search=Dinka%20Sugoi Dinka Blista Kanjo – https://gtacars.net/?search=Dinka%20Blista%20Kanjo Maxwell Asbo – https://gtacars.net/?search=Maxwell%20Asbo Bravado Gauntlet Hellfire – https://gtacars.net/?search=Bravado%20Gauntlet%20Hellfire Bravado Classic Gauntlet – https://gtacars.net/?search=Bravado%20Classic%20Gauntlet Cheburek – https://gtacars.net/?search=Cheburek Fagaloa – https://gtacars.net/?search=Fagaloa Clique – https://gtacars.net/?search=Clique Savestra – https://gtacars.net/?search=Savestra Sentinel Classic – https://gtacars.net/?search=Sentinel%20Classic Riata – https://gtacars.net/?search=Riata Issi Classic – https://gtacars.net/?search=Issi%20Classic Deathbike 3 – https://gtacars.net/?search=Deathbike%203 Canis Kamacho – https://gtacars.net/?search=Canis%20Kamacho Lampadi Michelli GT – https://gtacars.net/?search=Lampadi%20Michelli%20GT Tulip – https://gtacars.net/?search=Tulip Retinue – https://gtacars.net/?search=Retinue Streiter – https://gtacars.net/?search=Streiter Vapid Ellie – https://gtacars.net/?search=Vapid%20Ellie Impaler – https://gtacars.net/?search=Impaler Vamos – https://gtacars.net/?search=Vamos Comet Retro – https://gtacars.net/?search=Comet%20Retro Comet – https://gtacars.net/?search=Comet Comet SR – https://gtacars.net/?search=Comet%20SR Flash GT – https://gtacars.net/?search=Flash%20GT Jester Classic – https://gtacars.net/?search=Jester%20Classic Z190 – https://gtacars.net/?search=Z190 Rapid GT Classic – https://gtacars.net/?search=Rapid%20GT%20Classic Deviant – https://gtacars.net/?search=Deviant Vapid Dominator Classic (Mod Car) – https://gtacars.net/?search=Vapid%20Dominator%20Classic Vapid Dominator GTX – https://gtacars.net/?search=Vapid%20Dominator%20GTX GT500 – https://gtacars.net/?search=GT500 Raiden – https://gtacars.net/?search=Raiden Pfister Neon – https://gtacars.net/?search=Pfister%20Neon Classic Cheetah – https://gtacars.net/?search=Classic%20Cheetah Pariah – https://gtacars.net/?search=Pariah Brute Taco Van – https://gtacars.net/?search=Brute%20Taco%20Van Brute Mr Tasty – https://gtacars.net/?search=Brute%20Mr%20Tasty Western Zombie V8 – https://gtacars.net/?search=Western%20Zombie%20V8 Matibatsu Manchez Scout C – https://gtacars.net/?search=Matibatsu%20Manchez%20Scout%20C Zirconium Journey 2 – https://gtacars.net/?search=Zirconium%20Journey%202 Vapid Sandroamer RV – https://gtacars.net/?search=Vapid%20Sandroamer%20RV Vapid Sandking XL – https://gtacars.net/?search=Vapid%20Sandking%20XL Vapid Sandking Utility SWB 2 – https://gtacars.net/?search=Vapid%20Sandking%20Utility%20SWB%202 Vapid Sandking Utility Single Cab – https://gtacars.net/?search=Vapid%20Sandking%20Utility%20Single%20Cab Vapid Sandking Utility Crew Cab – https://gtacars.net/?search=Vapid%20Sandking%20Utility%20Crew%20Cab Vapid Sandking SWB – https://gtacars.net/?search=Vapid%20Sandking%20SWB Vapid Sandking RV – https://gtacars.net/?search=Vapid%20Sandking%20RV Vapid Riata Retro – https://gtacars.net/?search=Vapid%20Riata%20Retro Vapid Riata Classic – https://gtacars.net/?search=Vapid%20Riata%20Classic Karin Rebel SWB – https://gtacars.net/?search=Karin%20Rebel%20SWB Karin Rebel City – https://gtacars.net/?search=Karin%20Rebel%20City Karin Rebel 4x4 – https://gtacars.net/?search=Karin%20Rebel%204x4 Karin Raider – https://gtacars.net/?search=Karin%20Raider Vapid Guardian RV – https://gtacars.net/?search=Vapid%20Guardian%20RV Vapid Contender Classic – https://gtacars.net/?search=Vapid%20Contender%20Classic Declasse Alamo Retro – https://gtacars.net/?search=Declasse%20Alamo%20Retro Declasse 550SS – https://gtacars.net/?search=Declasse%20550SS Dinka Verus – https://gtacars.net/?search=Dinka%20Verus Nagasaki Blazer – https://gtacars.net/?search=Nagasaki%20Blazer Declasse Tornado Junker – https://gtacars.net/?search=Declasse%20Tornado%20Junker Declasse Tornado Junker Convertible – https://gtacars.net/?search=Declasse%20Tornado%20Junker%20Convertible BF Surfer Rusty – https://gtacars.net/?search=BF%20Surfer%20Rusty Nagasaki BF400 – https://gtacars.net/?search=Nagasaki%20BF400 Bravado Duneloader – https://gtacars.net/?search=Bravado%20Duneloader Zirconium Journey – https://gtacars.net/?search=Zirconium%20Journey Maibatsu Sanchez – https://gtacars.net/?search=Maibatsu%20Sanchez Karin Rebel (Rusty) – https://gtacars.net/?search=Karin%20Rebel%20Rusty Nagasaki Street Blazer – https://gtacars.net/?search=Nagasaki%20Street%20Blazer Maibatsu Manchez – https://gtacars.net/?search=Maibatsu%20Manchez Canis Seminole – https://gtacars.net/?search=Canis%20Seminole Brute Camper – https://gtacars.net/?search=Brute%20Camper Vapid Sadler – https://gtacars.net/?search=Vapid%20Sadler Canis Mesa – https://gtacars.net/?search=Canis%20Mesa Declasse Burrito – https://gtacars.net/?search=Declasse%20Burrito Dundreary Landstalker – https://gtacars.net/?search=Dundreary%20Landstalker Canis Mesa Offroad Package – https://gtacars.net/?search=Canis%20Mesa%20Offroad%20Package Gallivanter Baller S-TD – https://gtacars.net/?search=Gallivanter%20Baller%20S-TD Vapid Dominator GT – https://gtacars.net/?search=Vapid%20Dominator%20GT Monstrociti – https://gtacars.net/?search=Monstrociti Cavalcade 2023 – https://gtacars.net/?search=Cavalcade%202023 Cavalcade XL – https://gtacars.net/?search=Cavalcade%20XL Imperial Passenger – https://gtacars.net/?search=Imperial%20Passenger Canis Terminus – https://gtacars.net/?search=Canis%20Terminus FR 36 – https://gtacars.net/?search=FR%2036 Caracara 2022 – https://gtacars.net/?search=Caracara%202022 Annis Remus II – https://gtacars.net/?search=Annis%20Remus%20II Karin Vivanite – https://gtacars.net/?search=Karin%20Vivanite Karin Sultan RS – https://gtacars.net/?search=Karin%20Sultan%20RS Imponte Nightshade – https://gtacars.net/?search=Imponte%20Nightshade Vapid Riata TX – https://gtacars.net/?search=Vapid%20Riata%20TX Vapid Dominator GTX 2024 – https://gtacars.net/?search=Vapid%20Dominator%20GTX%202024 Vapid Sandstorm XL – https://gtacars.net/?search=Vapid%20Sandstorm%20XL Declasse Vigero ZX Convertible – https://gtacars.net/?search=Declasse%20Vigero%20ZX%20Convertible Vapid Sandstorm D205 Hellenbach – https://gtacars.net/?search=Vapid%20Sandstorm%20D205%20Hellenbach Vapid Sandstorm D205 XL – https://gtacars.net/?search=Vapid%20Sandstorm%20D205%20XL Vapid Sandstorm D205 – https://gtacars.net/?search=Vapid%20Sandstorm%20D205 Vapid Riata S – https://gtacars.net/?search=Vapid%20Riata%20S Weeny Issi Sport – https://gtacars.net/?search=Weeny%20Issi%20Sport Maibatsu Kuruma S – https://gtacars.net/?search=Maibatsu%20Kuruma%20S Coil Raiden S – https://gtacars.net/?search=Coil%20Raiden%20S Ubermacht Niobe – https://gtacars.net/?search=Ubermacht%20Niobe Canis Castigator – https://gtacars.net/?search=Canis%20Castigator Annis Euros X32 – https://gtacars.net/?search=Annis%20Euros%20X32 Enus Paragon S – https://gtacars.net/?search=Enus%20Paragon%20S Benefactor Vorschlaghammer – https://gtacars.net/?search=Benefactor%20Vorschlaghammer Vapid Dominator FX – https://gtacars.net/?search=Vapid%20Dominator%20FX Invetero Coquette D1 – https://gtacars.net/?search=Invetero%20Coquette%20D1 Vapid Aleutian – https://gtacars.net/?search=Vapid%20Aleutian Declasse Alamo 2700LX – https://gtacars.net/?search=Declasse%20Alamo%202700LX Declasse Granger 3700LX – https://gtacars.net/?search=Declasse%20Granger%203700LX Brute Regent – https://gtacars.net/?search=Brute%20Regent Brute Regent XL – https://gtacars.net/?search=Brute%20Regent%20XL Dinka Blista Compact Roadster – https://gtacars.net/?search=Dinka%20Blista%20Compact%20Roadster Vapid Sandstorm D205 SWB – https://gtacars.net/?search=Vapid%20Sandstorm%20D205%20SWB Declasse Yosemite 1500 – https://gtacars.net/?search=Declasse%20Yosemite%201500 Vapid Sandstorm – https://gtacars.net/?search=Vapid%20Sandstorm Dinka Chavos V6 – https://gtacars.net/?search=Dinka%20Chavos%20V6 Vapid Firebolt ASP – https://gtacars.net/?search=Vapid%20Firebolt%20ASP Dinka Jester RR Widebody – https://gtacars.net/?search=Dinka%20Jester%20RR%20Widebody Bravado Banshee GTS – https://gtacars.net/?search=Bravado%20Banshee%20GTS Vapid Uranus LozSpeed – https://gtacars.net/?search=Vapid%20Uranus%20LozSpeed Bravado Bison 25XD – https://gtacars.net/?search=Bravado%20Bison%2025XD Bravado Bison 35XD – https://gtacars.net/?search=Bravado%20Bison%2035XD Bravado Bison 45XD – https://gtacars.net/?search=Bravado%20Bison%2045XD Bravado Bison 35XD Sasquatch – https://gtacars.net/?search=Bravado%20Bison%2035XD%20Sasquatch Weeny Issi Sport Plus – https://gtacars.net/?search=Weeny%20Issi%20Sport%20Plus Ocelot Jugular E – https://gtacars.net/?search=Ocelot%20Jugular%20E Ubermacht Revolter – https://gtacars.net/?search=Ubermacht%20Revolter Annis Savestra ZR-150 – https://gtacars.net/?search=Annis%20Savestra%20ZR-150 Dewbauchee Super GTS – https://gtacars.net/?search=Dewbauchee%20Super%20GTS Karin S95 – https://gtacars.net/?search=Karin%20S95 Lampadati Casco – https://gtacars.net/?search=Lampadati%20Casco Lampadati Pigalle – https://gtacars.net/?search=Lampadati%20Pigalle Obey 10F Widebody – https://gtacars.net/?search=Obey%2010F%20Widebody Obey 10F – https://gtacars.net/?search=Obey%2010F Ocelot Ardent – https://gtacars.net/?search=Ocelot%20Ardent Benefactor Schafter V12 RS – https://gtacars.net/?search=Benefactor%20Schafter%20V12%20RS Annis ZR-150 – https://gtacars.net/?search=Annis%20ZR-150 Pfister Comet ST2 – https://gtacars.net/?search=Pfister%20Comet%20ST2 Imponte Arbiter GT – https://gtacars.net/?search=Imponte%20Arbiter%20GT Pfister Astron Custom – https://gtacars.net/?search=Pfister%20Astron%20Custom Benefactor Spritzer STR – https://gtacars.net/?search=Benefactor%20Spritzer%20STR Grotti Deimos GTS – https://gtacars.net/?search=Grotti%20Deimos%20GTS Karin Sigma-Three – https://gtacars.net/?search=Karin%20Sigma-Three Bravado Banshee Phase One – https://gtacars.net/?search=Bravado%20Banshee%20Phase%20One Karin Everon RS – https://gtacars.net/?search=Karin%20Everon%20RS Annis Minimus – https://gtacars.net/?search=Annis%20Minimus Ubermacht Sentinel GTS – https://gtacars.net/?search=Ubermacht%20Sentinel%20GTS Again, I completely understand that some of these may already exist, be planned, or simply not fit the server's vision. This isn't meant as a demand—just a collection of ideas that I think would greatly expand player choice and make the dealership feel even more complete. Thanks again for all the work you put into the server! ❤️
-
-
-
-
At least that, but not 1,400$ for a car you bought for 80-90k, right?
-
-
I might agree to @Musiceith and @Kaos. Already enough to charge ur battery when you're just inside a property of a vehicle, doing it manually just a little bit annoying 😄
-
Agree, would be nice to have it added.
-
I would like to suggest adding a dedicated Vehicle Sales section to the forums. This would make it much easier for members to buy and sell vehicles while keeping all listings organized in one place. A dedicated category would also allow sellers to post multiple photos, detailed descriptions, specifications, and other important information that buyers typically want to see before making contact. This category shouldn't be limited to cars—it should include all types of vehicles, such as: Cars Motorcycles Boats ATVs/UTVs RVs and campers Trucks Trailers Other vehicles Having a dedicated Vehicle Sales section would improve the browsing experience, make listings easier to find, and provide a better marketplace for the community.
-
Hello everyone! I'd like to raise a concern regarding the current dealership buyback system, as I believe it could be improved to better reflect the server's economy and provide a fairer experience for all players. 📉 The Current Situation Right now, when purchasing a vehicle from the dealership, you're making a significant financial investment. Many vehicles cost $30,000, $50,000, $80,000, or even more. However, if you later decide to sell that same vehicle back to the dealership, the amount you receive is shockingly low. Example: - Vehicle purchase price: $80,000 - Dealership buyback price: ~$1,400 That means the vehicle loses over 98% of its value, which feels incredibly excessive. 💰 Why This Is a Problem I completely understand that vehicles should depreciate over time. Players shouldn't be able to sell a car for the same price they paid—or make a profit. However, the current values are so low that they discourage players from: Upgrading to a different vehicle. Trying out new cars. - Recovering even a small portion of the money they spent. Enjoying one of the biggest investments on the server. Considering the amount of time required to earn money through jobs, businesses, and roleplay, buying a vehicle is a major commitment. Receiving only a tiny fraction of its value makes changing vehicles feel more like a punishment than a normal part of progression. 📌Suggested Changes Instead of the current system, I believe dealership buyback prices should be adjusted to better match the server's economy. Some possible solutions could include: - Increase the base buyback value to a more reasonable percentage (for example, 60-80% of the original purchase price). This would still ensure players lose money when selling their cars, but it would no longer feel like their investment has become virtually worthless. Vehicle depreciation is an important part of any economy. That said, receiving around $1,400 for a vehicle originally purchased for $80,000 simply doesn't feel balanced—especially when considering current salaries, the time required to earn money, and the overall server economy. I believe this is something worth taking into serious consideration. A fair adjustment to dealership buyback prices would improve the overall player experience while keeping the economy balanced and sustainable. Thank you for taking the time to read this suggestion. I'd love to hear what the community and the management team think about this.
-
Thanks @maf @Luminin Thanks! I am also very happy to be here with such a nice team! ❤️